In this step by step complete tutorial on Spring MVC, you will learn how to develop Spring MVC Web Application with Spring, Hibernate, JSP/JSTL, MySQL by using Java Configurations and annotations without using any XML based configurations.
In this step by step MVC tutorial, we will develop a Stock Management System module with some basic CRUD operations.
At the end of this tutorial you will know how to:
- Create a Spring MVC Maven Project
- Use Controllers, Services, DAO patterns to develop a complete Spring MVC module.
- Integrate with MySQL database using Hibernate ORM.
- Display data from database in JSP pages using JSTL tag libraries.
- Create JSP forms for user to add new data into the database.
This tutorial is distributed in multiple steps and all the code for each step is provided in the tutorial along with description of all major concepts.
Who Should Read This Tutorial?
This tutorial is written in a detailed manner with each and every step explained thoroughly and it is recommended for anyone who has concepts of core java and is eager to jump into the bandwagon of Spring Framework—particularly Spring MVC.
You should also have basic knowledge of relational databases on top of OOP concepts. An understanding of Eclipse IDE is also desired as we will use Eclipse IDE for developing the application.
Test Scenario Implemented as Part of This Tutorial
In this tutorial, we will implement a basic module of Product Stock Management. This stock management system will provide options for the user to:
- Add New Products in the stock management system
- Display All Products available in the stock.
- Delete Any Product from the stock management system.
Once you have understood all the concepts and completed the tutorial, you can extend this project to add additional features like:
- Update Any existing products in stock management system.
- Add Search Functionality to search for any product.
- Add a Login module for user authentication and session management.
Technologies Used for This Spring MVC Tutorial
- Eclipse IDE
- Maven for Dependencies inclusion
- Spring Framework 5.1.0
- Hibernate Framework 5.3.5
- JSTL Version 1.2.1
- MySQL database version 5.1.47
Now you have fair idea of all the tools and technologies being used and also about the business case we are going to implement; let us jump into the implementation part step by step.
As part of this tutorial, I will not explain Spring MVC Flow as I have explained Spring MVC Request Flow in detail in another post with the link below:
Spring MVC Request Flow Explained Step by Step
If you want to refresh your concepts about Spring MVC flow or if you don’t have prior idea of MVC Request flow, I will highly recommend to spend a couple of minutes reading the above post and then move forward with Step 2 of this Spring MVC practical implementation tutorial on the next page.
Step 1: Create MySQL Database Table for Spring MVC Tutorial Stock Management System Module
As I explained before, we will implement only one primary module for stock management system for allowing user to add new products to the stock, delete any products and to view all details of the products available in the stock. For this basic module, we will create only one table in the database.
Connect to your MySQL server and create a new Schema. I created a schema with the name STM using below statement:
CREATE SCHEMA ‘stm’ ;
Now we will create a table in this schema with the below script:
CREATE TABLE TBL_PRODUCT (PRODUCT_ID int NOT NULL,PRODUCT_NAME varchar(255),PRODUCT_PRICE double,PRODUCT_TYPE varchar(255),PRIMARY KEY (PRODUCT_ID));
With the database table ready, we are now good to go with our next step of setting up our Eclipse Maven Project.
Step 2: Create Maven Web Project Using Eclipse IDE and Add All Dependencies
To create a Maven Project, in your Eclipse IDE choose File–>New–>Project and then choose Maven Project. A new wizard will open. For the Work space location, keep default or else if you want to place the project in a new workspace, you can specify that as well.
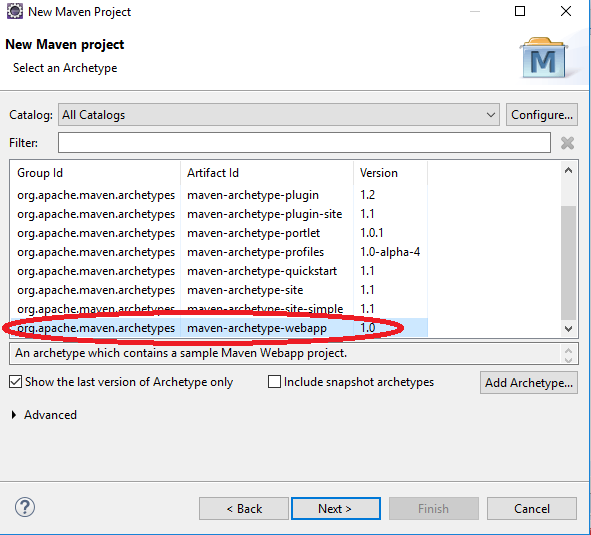
In the Next step, you will be asked to choose the archetype from the list. We are provided with different archetypes for different type of projects to choose. Since we are going to implement a web project, we will choose maven-archetype-webapp for our project as you can see below:
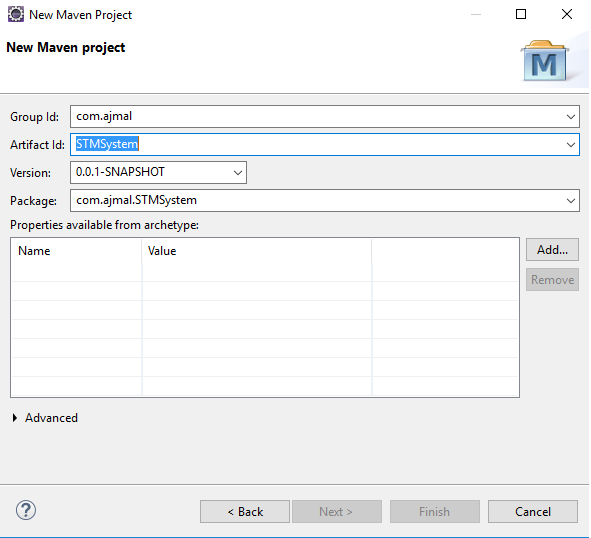
In the next step of the wizard, you need to specify your project group id, ArtifactId and your project’s package name will be populated accordingly.
For artifactid, provide the project name. For this tutorial, I am providing the name as STMSystem as you can see in the screenshot below:
Just click Finish and your Maven project basic setup is completed.
Now we need to add dependencies for our project. Maven provides a very convenient option of getting all required dependencies downloaded automatically from maven repository. For this purpose, maven project has an XML file (POM.xml) where we need to add our dependencies list and maven will download all required jar files for us itself and make them available for us.
For our Spring MVC project, we need dependencies for Spring Core, Spring MVC, Hibernate Core, Hibernate Validator, MySql and JSTL and we need to add dependency tags for all these in our pom.xml file so that maven can download the required jars for us.
You can always go to maven repositories website and search for any dependency and then copy dependency xml tag from there for the version of your choice and paste that in your pom.xml file.
Below is the POM.xml file for our Spring MVC tutorial which lists all the dependencies that I needed along with the versions. Please note that by the time you read this tutorial; we might have new updated versions for these dependencies and it is always recommended to use the latest stable version.
    4.0.0
    com.ajmal
  STMSystem
  war
  0.0.1-SNAPSHOT
  STMSystem Maven Webapp
    http://maven.apache.org

        false
        5.1.0.RELEASE
        5.2.17.Final
        5.4.1.Final
        0.9.5.2
        1.2.1
        1.1.2
        3.1.0
        2.3.1
        1.8.0.10


    javax.servlet
    jstl
    1.2


        <!-- Spring MVC Dependency -->

            org.springframework
            spring-webmvc
            ${spring.version}

        <!-- Spring ORM -->

            org.springframework
            spring-orm
            ${spring.version}

        <!-- Hibernate Core -->

            org.hibernate
            hibernate-core
            5.2.17.Final

        <!-- Hibernate Validator -->

            org.hibernate
            hibernate-validator
            ${hibernate.validator}

        <!-- JSTL Dependency -->

            javax.servlet.jsp.jstl
            javax.servlet.jsp.jstl-api
            ${jstl.version}


            taglibs
            standard
            ${tld.version}

        <!-- Servlet Dependency -->

            javax.servlet
            javax.servlet-api
            ${servlets.version}
            provided

        <!-- JSP Dependency -->

            javax.servlet.jsp
            javax.servlet.jsp-api
            ${jsp.version}
            provided


            mysql
            mysql-connector-java
            5.1.47


abc |
Once you will add all dependencies in your pom.xml file, you will notice that your Eclipse IDE will start downloading these dependencies for you from maven repository. This may take some time depending on your internet speed.
It is also important to mention here that any dependencies which you have used earlier in your other projects in same machine become available in your system’s local maven repository and in that case, maven doesn’t download them again from the internet and makes available locally available jars.
Congratulations. Your first and basic step of setting up maven project with all dependencies is completed and now you are good to go for the next step where we will start setting up our project hierarchy and define all necessary packages and folders.
Step 3: Create Packages for Configuration, Controller, Service and DAO Layer and Views Folders
A good java programmer always opts for the best practices and creates a project skeleton which follows certain rules and ensures that all project artifacts are created with proper packages and folder structure without any messy or jumbled crap. A good java project should be easily navigable in IDE and any developer should be able to quickly jump to different classes in various layers and by the names of the packages (and also classes and method names); one should be able to understand the purpose.
To ensure that we follow the standards (of course this is just a demo tutorial and we won’t be able to follow all industry standards here!) as much as we can during this tutorial.
We will create packages, classes and views by keeping following rules in mind:
- All Configuration Classes will be in the configuration package (com.ajmal.config)
- All Controller classes will be in the controller package (com.ajmal.controller)
- All service interfaces and classes will be in the service package (com.ajmal.service)
- All entity classes (Model Objects) will be in the entity package (com.ajmal.entity)
- All DAO interfaces and classes will be in the dao package (com.ajmal.dao)
- All views will be under WEB-INF/views/ folder (except index.jsp as we want to keep it available directly under WEB-INF intentionally)
- Properties files will be under resources folder.
With the above mentioned structure, our project will look like below:

Now we can proceed to Step 4 in the next page where we will implement our configuration classes and properties file(s).
Step 4: Implement Spring MVC Configuration Classes
In a typical XML configurations based Spring MVC application, we need to use WEB.xml file and define our Dispatcher Servlet inside this and then create another XML file for our dispatcher servlet. But now, Java based configurations are used and XML based configuration is becoming a history. We will also follow the norms and use Java based configurations in our project.
So if we are going to use Java based configurations, we need to have following configuration files in our com.ajmal.config package:
Application Context Class
Application Context class is a primary configuration class which provides necessary configurations for application to work and it will be referred later from the Web Initializer class.
In the Application Context Class, we will perform following major actions:
- We will refer to a properties file (which we will place in resources folder) and all database related properties will be read from this properties file.
- We will genertate SessionFactory by using LocalSessionFactoryBean For the session factory, we will also specify the base package to scan and data source.
- For transaction management, to use built-in transaction management support of hibernate, we will create hibernateTransactionManager for our session in this context class.
- We will use Spring Dependency Injection feature by creating Environment object through @Autowired annotation.
The class has been named as AppContext.java by me but you can name it anything as your preference.
Below is the code for this class:
package com.ajmal.config; import org.springframework.context.annotation.Configuration; import java.util.Properties; import javax.sql.DataSource; import org.springframework.beans.factory.annotation.Autowired; import org.springframework.context.annotation.Bean; import org.springframework.context.annotation.PropertySource; import org.springframework.core.env.Environment; import org.springframework.jdbc.datasource.DriverManagerDataSource; import org.springframework.orm.hibernate5.HibernateTransactionManager; import org.springframework.orm.hibernate5.LocalSessionFactoryBean; import org.springframework.transaction.annotation.EnableTransactionManagement; @Configuration @PropertySource("classpath:database.properties") @EnableTransactionManagement public class AppContext { @Autowired private Environment environment; @Bean public LocalSessionFactoryBean sessionFactory() { LocalSessionFactoryBean sessionFactory = new LocalSessionFactoryBean(); sessionFactory.setDataSource(dataSource()); sessionFactory.setPackagesToScan(new String[] { "com.ajmal" }); sessionFactory.setHibernateProperties(hibernateProperties()); return sessionFactory; } @Bean public DataSource dataSource() { DriverManagerDataSource dataSource = new DriverManagerDataSource(); dataSource.setDriverClassName(environment.getRequiredProperty("jdbc.driverClassName")); dataSource.setUrl(environment.getRequiredProperty("jdbc.url")); dataSource.setUsername(environment.getRequiredProperty("jdbc.username")); dataSource.setPassword(environment.getRequiredProperty("jdbc.password")); return dataSource; } private Properties hibernateProperties() { Properties properties = new Properties(); properties.put("hibernate.dialect", environment.getRequiredProperty("hibernate.dialect")); properties.put("hibernate.show_sql", environment.getRequiredProperty("hibernate.show_sql")); properties.put("hibernate.format_sql", environment.getRequiredProperty("hibernate.format_sql")); properties.put("hibernate.hbm2ddl.auto", environment.getRequiredProperty("hibernate.hbm2ddl.auto")); return properties; } @Bean public HibernateTransactionManager getTransactionManager() { HibernateTransactionManager transactionManager = new HibernateTransactionManager(); transactionManager.setSessionFactory(sessionFactory().getObject()); return transactionManager; } } |
- Front Controller (Dispatcher Servlet) Java Based Configuration
For Dispatcher Servlet (also known as Front Controller), we will create a new configuration class and in this class we will implement WebMvcConfigurer interface.
In this class we will implement a method to add resources location so that our Spring MVC project knows the location of resources (e.g. any static java script or image files).
We will also implement a bean with @Bean annotation for InternalViewResolver in this class. This bean will specify the suffix and prefix for our views.
Below is the code for our dispatcher servlet class FrontController.java
package com.ajmal.config; import org.springframework.context.annotation.Bean; import org.springframework.context.annotation.ComponentScan; import org.springframework.context.annotation.Configuration; import org.springframework.web.servlet.config.annotation.EnableWebMvc; import org.springframework.web.servlet.config.annotation.ResourceHandlerRegistry; import org.springframework.web.servlet.config.annotation.WebMvcConfigurer; import org.springframework.web.servlet.view.InternalResourceViewResolver; @Configuration @EnableWebMvc @ComponentScan(basePackages= {"com.ajmal"}) public class FrontController implements WebMvcConfigurer{ public void addResourceHandlers(ResourceHandlerRegistry registry) { registry.addResourceHandler("/resources/**").addResourceLocations("/resources/"); } @Bean public InternalResourceViewResolver resolver() { InternalResourceViewResolver vr= new InternalResourceViewResolver(); vr.setPrefix("/WEB-INF/views/"); vr.setSuffix(".jsp"); return vr; } } |
- WebInitializer.java (A Replacement of Web.xml file)
This class will be used to do the necessary configurations as a replacement of web.xml file which is used in xml based applications. Please note that name of the java class doesn’t matter here and you can name it anything as per your naming preferences or naming standards. This class extends AbstractAnnotationConfigDispatcherServletInitializer and it overrides methods of its super class to specify root configuration class, dispatcher servlet class and for servlet mapping. As you can see in the below java code for our WebIntializer.java class, we are providing class names from the two configuration classes we created before. We are aslo specifying “/” for servlet mapping which indicates that all the requests will be handled by this dispatcher servlet.
package com.ajmal.config; import org.springframework.web.servlet.support.AbstractAnnotationConfigDispatcherServletInitializer; public class WebInitializer extends AbstractAnnotationConfigDispatcherServletInitializer { @Override protected Class<?>[] getRootConfigClasses() { return new Class[] {AppContext.class}; } @Override protected Class<?>[] getServletConfigClasses() { return new Class[] {FrontController.class}; } @Override protected String[] getServletMappings() { return new String[] {"/"}; } } |
- Properties File
The last step of our configuration is to specify all our database and hibernate properties in a file under resources folder.
Our properties file is as below:
jdbc.driverClassName = com.mysql.jdbc.Driver jdbc.url = jdbc:mysql://<u>localhost</u>:3306/<u>stm</u> jdbc.username = root jdbc.password = root hibernate.dialect = org.hibernate.dialect.MySQL5InnoDBDialect hibernate.show_sql = true hibernate.format_sql = true hibernate.hbm2ddl.auto = update |
Step 5: Create Entity Class for Spring MVC Application
The entity class is a POJO with variables and corresponding getters and setters and a few annotations to mark it as an entity class. In the entity package, we will create a class annotated as @Entity. This entity class Product.java will act as a mapping to our database table TBL_PRODUCT and hibernate ORM will use this entity class as a reference for database operations in the DAO layer.
For the database table we have used @Table annotation to specify a table name. If table name and class name is same in that case, we don’t need to explicitly specify the table name.
We have also used @Id annotation to specify the primary key for the table with AUTO generation type to get it automatically incremented. To explicitly specify column names against the variables of this POJO, we have used @Column annotation.
Below is the code for this entity class:
package com.ajmal.entity; import javax.persistence.Column; import javax.persistence.Entity; import javax.persistence.GeneratedValue; import javax.persistence.GenerationType; import javax.persistence.Id; import javax.persistence.Table; @Entity @Table(name="TBL_PRODUCT") public class Product { @Override public String toString() { return "Product [productId=" + productId + ", productName=" + productName + ", productType=" + productType + ", productPrice=" + productPrice + "]"; } @Id @GeneratedValue(strategy=GenerationType.AUTO) @Column(name="PRODUCT_ID") private int productId; @Column(name="PRODUCT_NAME") private String productName; @Column(name="PRODUCT_TYPE") private String productType; @Column(name="PRODUCT_PRICE") private double productPrice; public int getProductId() { return productId; } public void setProductId(int productId) { this.productId = productId; } public String getProductName() { return productName; } public void setProductName(String productName) { this.productName = productName; } public String getProductType() { return productType; } public void setProductType(String productType) { this.productType = productType; } public double getProductPrice() { return productPrice; } public void setProductPrice(double productPrice) { this.productPrice = productPrice; } } |
Step 6: Implement Controller Class for Spring MVC Application
Once we have configuration classes implemented, we can now move forward to start implementing our core implementation classes. For this, controller class is the backbone of our application and we need to implement our controller class to handle all user requests which dispatcher servlet will pass to the controller class.
Controller class code is as shown below. I will explain important points about this class subsequently:
package com.ajmal.controller; import java.util.List; import org.springframework.beans.factory.annotation.Autowired; import org.springframework.stereotype.Controller; import org.springframework.web.bind.annotation.GetMapping; import org.springframework.web.bind.annotation.PostMapping; import org.springframework.web.bind.annotation.RequestParam; import org.springframework.web.servlet.ModelAndView; import com.ajmal.entity.Product; import com.ajmal.service.ProductService; @Controller public class ProductController { @Autowired ProductService ps; @GetMapping("/getall") public ModelAndView getAllProducts() { ModelAndView mv=new ModelAndView(); mv.setViewName("show"); List products= ps.getAllProducts(); mv.addObject("msg",products); return mv; } @PostMapping(value="/addproduct") public String addProduct(Product product) { ps.addProduct(product); return "redirect:/index.jsp"; } @GetMapping("/showadditionform") public String showAdditionForm() { return "add_product"; } @GetMapping("/deleteproduct") public String deleteProduct(@RequestParam("pid") int ProductID) { ps.deleteProduct(ProductID); return "redirect:/index.jsp"; } @GetMapping("/backtoindex") public String backToIndexPage() { return "redirect:/index.jsp"; } } |
Explanation of Controller Class:
This controller class is annotated with @Controller declaring it as a controller class. In this controller class we are implementing methods for different type of client requests including request to get all products, request to add new product, request to delete a product and also a method for controlling navigation to allow user to return to index page from any other page.
In this class, we are calling methods of Service Layer class (ProductService class) as we are layering our logic in Controller, Service and DAO layer.
To specify the URL for each method, we have used annotations like @GetMapping and @PostMapping for GET and POST methods respectively. We have also used @RequestParam annotation to capture parameter from user’s post request.
Step 7: Define Service Interface and Implement Service Layer for Spring MVC Web Application Tutorial
In this step, we will create an interface for our service layer with the name ProductService. This interface will contain signatures of all the methods which will be then implemented in the implementation class (ProductServiceImpl class).
This Service Layer will call methods of the layer under it—DAO layer as we don’t want to interact with database directly from Service Layer.
Below is the ProductService Interface code:
package com.ajmal.service; import java.util.List; import com.ajmal.entity.Product; public interface ProductService { List getAllProducts(); boolean addProduct(Product product); boolean deleteProduct(int productId); } |
We are implementing the methods of ProductService interface in the below class (ProductServiceImpl.java) where we are Autowiring object of our DAO class and calling DAO methods for each type of method. Note that we are using @Service annotation in this implementation class.
package com.ajmal.service; import java.util.List; import org.springframework.beans.factory.annotation.Autowired; import org.springframework.stereotype.Service; import com.ajmal.dao.ProductDAO; import com.ajmal.entity.Product; @Service("ps") public class ProductServiceImpl implements ProductService { @Autowired ProductDAO productDAO; public List getAllProducts() { return productDAO.getAllProducts(); } public boolean addProduct(Product product) { productDAO.addProduct(product); return true; } public boolean deleteProduct(int productId) { return productDAO.deleteProduct(productId); } } |
Step 8: Define DAO Interface and Implement DAO Class for Spring MVC Application
DAO layer is responsible for performing all the database level operations directly in the database and we will create a DAO interface here (ProductDAO interface) and then implement this interface in the DAO implementation class (ProductDAOImpl class). In this implementation class we will use Hibernate ORM technology to save products in the database table, fetching list of products from the database table and to delete any product with its primary key from the table.
ProductDAO interface is as below:
package com.ajmal.dao; import java.util.List; import com.ajmal.entity.Product; public interface ProductDAO { List getAllProducts(); boolean addProduct(Product product); boolean deleteProduct(int productId); } |
Next we have an implementation class to implement the methods of this DAO Interface. ProdcutDAOImpl.java class which implements this interface has all the logic for hibernate operations to save data in the database, fetch list of data from database and delete data from the database table.
Below is the code of ProductDAOImpl.java class. Please note that I haven’t implemented the code with all features as you will observe that exceptions are not handled in some cases and also in some cases, only happy scenarios are considered. This is because purpose of this tutorial is to make you aware of end to end implementation of the Spring MVC based web applications and not to focus on additional nitty gritty stuff.
package com.ajmal.dao; import java.util.List; import javax.persistence.Query; import org.hibernate.Session; import org.hibernate.SessionFactory; import org.springframework.beans.factory.annotation.Autowired; import org.springframework.stereotype.Repository; import org.springframework.transaction.annotation.Transactional; import com.ajmal.entity.Product; @Repository public class ProductDAOImpl implements ProductDAO { @Autowired SessionFactory factory; @Transactional @SuppressWarnings({ "unchecked", "finally" }) public List getAllProducts() { List products = null; try { Session session=factory.getCurrentSession(); Query q=session.createQuery("from Product"); products= q.getResultList(); } catch (Exception e) {} finally { return products; } } @Transactional public boolean addProduct(Product product) { Session session=factory.getCurrentSession(); session.save(product); return true; } @Transactional public boolean deleteProduct(int productId) { Session session=factory.getCurrentSession(); Product p=session.get(Product.class, productId); session.delete(p); return true; } } |
Step 9: Create JSP Views for Spring MVC Web Application
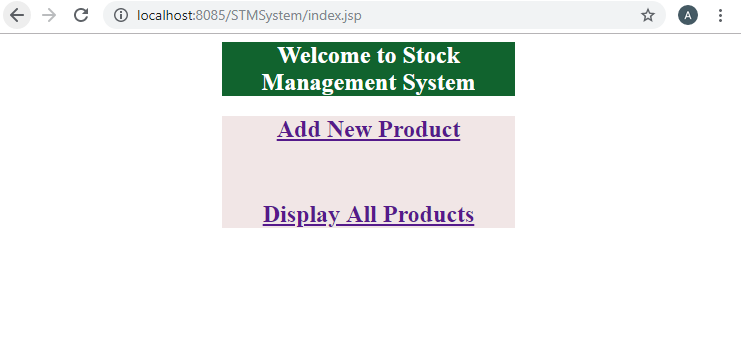
In our last step, we will create index.jsp page under WEB-INF which will be the starting page of our application. Excuse me for design of these pages as I haven’t done anything fancy with the design as focus of this tutorial is on Spring MVC implementation and not on the design principles.
A basic JSP page with JSTL tags will serve as our index page as below:
The page JSP code is as below:
<%@ page language=<em>"java"</em> contentType=<em>"text/html; charset=UTF-8"</em> pageEncoding=<em>"UTF-8"</em>%> <%@ taglib uri=<em>"http://java.sun.com/jsp/jstl/core"</em> prefix=<em>"c"</em> %> <html> <title>Stock Management System Demo</title> <body> <h2><u><</u><u>center</u> <u>style</u><u>=</u><em><u>"margin-left:30%; margin-right:30%;background-color: 11632E; color:#FFFFFF"</u></em><u>></u><u> Welcome to Stock Management System</u><u></</u><u>center</u><u>></u></h2> <div style=" text-align:<em>center</em>; margin-left:<em>30%</em>; background-color: <em>#F1E6E6</em>; width:<em>40%</em>"> <c:url value=<em>"showadditionform"</em> var=<em>"add_form"</em> /> <h2><a href=<em>"</em>${add_form}<em>"</em>> Add New Product</a></h2> <br /> <c:url value=<em>"getall"</em> var=<em>"show_products"</em> /> <h2><a href=<em>"</em>${show_products}<em>"</em>> Display All Products</a></h2> </div> </body> </html> |
We are using two more JSP pages for adding products and showing product list. The JSP page to add a new Product in the stock management system will look like below:
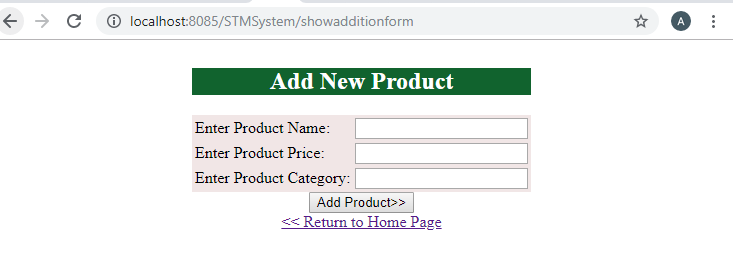
JSP code for this add_product.jsp is as below:
<%@ page language=<em>"java"</em> contentType=<em>"text/html; charset=UTF-8"</em> pageEncoding=<em>"UTF-8"</em>%> <%@ taglib uri=<em>"http://java.sun.com/jsp/jstl/core"</em> prefix=<em>"c"</em> %> <!DOCTYPE html PUBLIC "-//W3C//DTD HTML 4.01 Transitional//EN" "http://www.w3.org/TR/html4/loose.dtd"> <html> <head> <meta http-equiv=<em>"Content-Type"</em> content=<em>"text/html; charset=UTF-8"</em>> <title>Add New Stock Product</title> </head> <body> <div align=<em>"center"</em>> <form method=<em>"POST"</em> action=<em>"addproduct"</em>> <table style="align: <em>center</em>; background-color:<em>#F1E6E6</em>; border=0; cellpadding=5"> <caption><u><</u><u>h2</u> <u>style</u><u>="</u><u>background-color</u><u>: </u><em><u>#11632E</u></em><u>; </u><u>color</u><u>:</u><em><u>#FFFFFF</u></em><u>;</u><u>align</u><u>:</u><em><u>center</u></em><u>"</u><u>></u>Add New Product</h2></caption> <tr> <td> Enter Product Name:</td><td><input type=<em>"text"</em> name=<em>"productName"</em>></td> </tr> <tr> <td> Enter Product Price:</td><td><input type=<em>"text"</em> name=<em>"productPrice"</em>></td> </tr> <tr> <td> Enter Product Category:</td><td><input type=<em>"text"</em> name=<em>"productType"</em>></td> </tr> </table> <input type=<em>"submit"</em> value=<em>"Add Product>>"</em>> </form> <c:url var=<em>"back_home"</em> value=<em>"backtoindex"</em> /> <a href=<em>"</em>${back_home}<em>"</em>> <u><</u>< Return to Home Page</a> </div> </body> </html> |
Our last JSP page which will show a list of all the products will be like below:
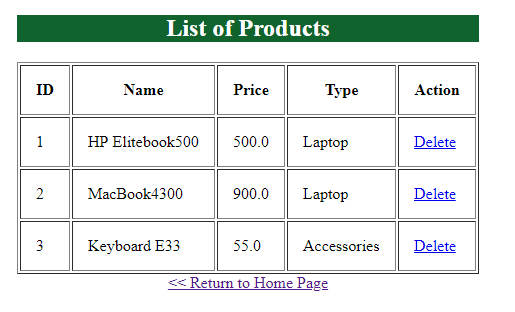
Below is the code for this JSP page for showing list of all the products:
<%@ page language=<em>"java"</em> contentType=<em>"text/html; charset=UTF-8"</em> pageEncoding=<em>"UTF-8"</em>%> <%@ taglib uri=<em>"http://java.sun.com/jsp/jstl/core"</em> prefix=<em>"c"</em> %> <!DOCTYPE html PUBLIC "-//W3C//DTD HTML 4.01 Transitional//EN" "http://www.w3.org/TR/html4/loose.dtd"> <html> <head> <meta http-equiv=<em>"Content-Type"</em> content=<em>"text/html; charset=UTF-8"</em>> <title>JSP List Product Records</title> </head> <body> <div align=<em>"center"</em>> <table border=<em>"1"</em> cellpadding=<em>"15"</em>> <caption><u><</u><u>h2</u> <u>style</u><u>="</u><u>background-color</u><u>: </u><em><u>#11632E</u></em><u>; </u><u>color</u><u>:</u><em><u>#FFFFFF</u></em><u>;</u><u>align</u><u>:</u><em><u>center</u></em><u>"</u><u>></u>List of Products</h2></caption> <tr> <th>ID</th> <th>Name</th> <th>Price</th> <th>Type</th> <th>Action</th> </tr> <c:forEach var=<em>"product"</em> items=<em>"</em>${msg}<em>"</em>> <c:url var=<em>"deletelink"</em> value=<em>"deleteproduct"</em>> <c:param name=<em>"pid"</em> value=<em>"</em>${product.productId}<em>"</em>></c:param> </c:url> <tr> <td><c:out value=<em>"</em>${product.productId}<em>"</em> /></td> <td><c:out value=<em>"</em>${product.productName}<em>"</em> /></td> <td><c:out value=<em>"</em>${product.productPrice}<em>"</em> /></td> <td><c:out value=<em>"</em>${product.productType}<em>"</em> /></td> <td><a href=<em>"</em>${deletelink}<em>"</em>>Delete</a></td> </tr> </c:forEach> </table> <c:url var=<em>"back_home"</em> value=<em>"backtoindex"</em> /> <a href=<em>"</em>${back_home}<em>"</em>> <u><</u>< Return to Home Page</a> </div> </body> </html> |
This completes our Spring MVC tutorial using JSP, Spring, Hibernate technologies. If you have any queries or if you face any issues, feel free to comment.
Hi Ajmal,
first of all thanks for the guide.
I followed your step-by-step instructions, but when I launch the project on Tomcat it only shows me the index well, when I click on the items in the index menu it gives me a 404 error. Can you help me?
This is the url that tries to load when I click on the link “Add new product” – “http: // localhost: 8080 / abc / $% 7Badd_form% 7D” since the variable is not printed well in the jsp file I also tried with the link “http: // localhost: 8080 / abc / showadditionform” but the result is always error 404.
Thanks in advance.
In your JSP pages add the following code:
This will enable expression language.
Hi Pierre,
what about the code to add in the jsp page?
http://localhost:8080/STMSystem/showadditionform
it seems that the controller is not involved
thanks!
Hi Hussain,
I just gone through this tutorials amazing one, each and every point is very useful.
But I have a query regarding ProductController(ModelAndView part) return statement. Could you please give a explanation for all return statements in the ProductController. (return “redirect:/index.jsp”;)
Thanks & Best Regards
Samad
Dear Samad,
Return statements here simply specify which views to get rendered next.