REST web services are very widely used popular mode of integration for data transfer between back-end systems and any type of client applications including web, mobile etc. REST uses HTTP protocol for transport and Restful web services can be implemented using any of the available HTTP Verbs (GET, POST, PUT, DELETE etc.).
Spring framework provides a great support with quite a number of annotations to facilitate developers to implement REST web services. In this Java Spring REST Web Service tutorial, I will explain step by step how to develop REST web service using Spring with JSON and XML payload support.
Who Should Read This Spring REST Web Service Tutorial?
This tutorial has been written with all the steps explained in detail and with code available for each and every class and hence, It is equally useful for beginners as well as for those who have prior knowledge of Spring Framework.
However, you should have basic knowledge of Java and you should have basic concepts of Spring Framework as well as REST web services.
By The end of this Spring REST Web Service Tutorial you will know:
• How to Setup an Eclipse Project for developing Spring Restful web services.
• How to develop Spring REST web Service with MVC design pattern.
• How to implement GET, POST, PUT & DELETE operations in a Java Spring REST web service.
• How to use JSON and XML payload as request & response for REST web services.
• How to test a Spring REST web service using clients like Postman or a standard web browser.
Use Case for Java Spring REST Web Service Tutorial
For this tutorial, we will implement a REST web service to perform CRUD operations for a Library Management System with following operations:
• An operation to add New Book using HTTP POST method.
• An operation to update any existing book using HTTP PUT method.
• An operation to delete a book using HTTP DELETE operation
• An operation to fetch details for a book using HTTP GET operation
• An operation to fetch details of all books using HTTP GET operation
To keep the focus on REST concepts and not on database/ORM; we will not use database connectivity in this tutorial and will create in-memory list of books to perform all the operations.
Once you complete this tutorial, you can take it as your practice assignment to further extend this project by adding hibernate functionality for this web service to persist records in a database table.
Now with the whole scenario for this Spring REST web service explained; we can proceed with the step by step tutorial to start developing the web service.
Step 1: Create Eclipse Maven Project and Add All Dependencies for Spring REST Web Service Implementation
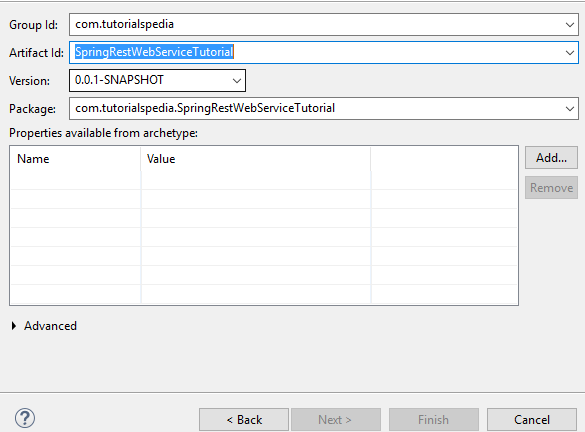
Using Eclipse, create a new Maven Project by choosing File–> New–>Project–>Maven Project. For Project Archetype, choose maven-archetype-webapp as we will be developing a web application. Next provide a Group Id and Artifact Id. I have specified com.tutorialspedia for Group Id and SpringRestWebServiceTutorial for Artifact Id as you can see below:
Once we have created the maven project, we need to add dependencies in pom.xml file so that all required libraries are downloaded automatically by maven.
For our Spring REST Web Service Tutorial Project we need following dependencies:
• Spring Core Dependency for using spring core features (e.g. Dependency Injection)
• Spring MVC Dependency for setting up our Spring MVC based project.
• Jackson Data Format Dependency for support of JSON and XML payload.
Our pom.xml file with all dpeendencies specified will look like below:
  4.0.0
  com.ajmal
  SpringRestWebServiceTutorial
  war
  0.0.1-SNAPSHOT
  restwebservices Maven Webapp
  http://maven.apache.org


    com.fasterxml.jackson.dataformat
    jackson-dataformat-xml
    2.9.9


    org.springframework
    spring-core
    5.1.0.RELEASE


    org.springframework
    spring-webmvc
    5.1.0.RELEASE


SpringRestWebServiceTutorial |
Once all dependencies have been downloaded, we are good to go with the next step we will create all packages so that we may start our actual implementation of REST web service.
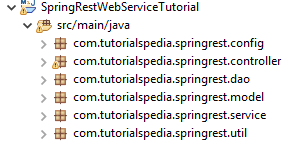
Step 2: Create All Packages for Configuration, Controller, Service, Model & DAO Layers
We need to follow the best practices and we will create separate packages for placing the classes & interfaces in their respective packages.
We will create following packages:
• com.tutorialspedia.springrest.config package for all our configurations files for Spring MVC (Front Controller Dispatcher Servlet and App Initializer Classes). We are creating this package as we want to use Java based configurations and no XML based configurations will be used.
• com.tutorialspedia.springrest.controller package for our bookController controller class.
• com.tutorialspedia.springrest.model package for our Book model class.
• com.tutorialspedia.springrest.service package for our bookService interface and bookServiceImpl implementation class.
• com.tutorialspedia.springrest.dao for our bookServiceDAO interface and bookServiceDAOImpl implementation class.
• com.tutorialspedia.springrest.util for our utility class which will be used to populate list of books as we are not using database.
With all the above packages created, our project structure will look like below:
Now we can proceed to our next step for implementing our configuration classes in config package.
Step 3: Create Configuration Classes for Dispatcher Servlet and Application Initializer for Spring REST Web Service Tutorial
For our project, we are using Java based configurations and not using any XML based configurations, so we need to have java classes to replace WEB.xml and Dispatcher Servlet XML files so that all necessary configurations are made available with necessary annotations for enabling MVC flow.
FrontController.java Class
Our first configuration class is FrontController.java class where we are performing following actions:
• We are using @Configuration annotation to mark it as configuration class,
• We are using @EnableWebMvc annotation so that our project becomes MVC enabled.
• We are specifying our base package for MVC scanning using @ComponentScan annotation.
Below is the code for our Front Controller (Dispatcher Servlet) class:
package com.tutorialspedia.springrest.config; import org.springframework.context.annotation.ComponentScan; import org.springframework.context.annotation.Configuration; import org.springframework.web.servlet.config.annotation.EnableWebMvc; @Configuration @EnableWebMvc @ComponentScan(basePackages= {"com.tutorialspedia.springrest"}) public class FrontController { } |
AppInitializer.java Class
Our second configuration class is AppInitializer.java which serves the role same as a Web.XML file in XML based configurations. In this class, we are extending AbstractAnnotationConfigDispatcherServletInitializer class and implementing methods of this super class to specify servlet dispatcher configuration class and servlet mapping url pattern.
Complete code for our AppInitializer.java class is given below:
package com.tutorialspedia.springrest.config; import org.springframework.web.servlet.support.AbstractAnnotationConfigDispatcherServletInitializer; public class AppInitializer extends AbstractAnnotationConfigDispatcherServletInitializer{ @Override protected Class<?>[] getRootConfigClasses() { return null; } @Override protected Class<?>[] getServletConfigClasses() { return new Class[] {FrontController.class}; } @Override protected String[] getServletMappings() { return new String [] {"/"}; } } |
Now with our configuration classes implemented, we can proceed to our next major step of defining our Model Class.
Step 4: Implement Model Class for Spring REST Web Service Tutorial
In this step we will create our model class Book.java which is a simple POJO having book properties and associated getter & setter methods.
Below is the complete code for our model class Book.java:
package com.tutorialspedia.springrest.model; public class Book { long bookId; String bookTitle; Double bookPrice; String bookLang; boolean isAvailable; public Book() { } public Book(long bookId, String bookTitle, double d, String bookLang, boolean isAvailable) { super(); this.bookId = bookId; this.bookTitle = bookTitle; this.bookPrice = d; this.bookLang = bookLang; this.isAvailable = isAvailable; } public long getBookId() { return bookId; } public void setBookId(long bookId) { this.bookId = bookId; } public String getBookTitle() { return bookTitle; } public void setBookTitle(String bookTitle) { this.bookTitle = bookTitle; } public Double getBookPrice() { return bookPrice; } public void setBookPrice(Double bookPrice) { this.bookPrice = bookPrice; } public String getBookLang() { return bookLang; } public void setBookLang(String bookLang) { this.bookLang = bookLang; } public boolean isAvailable() { return isAvailable; } public void setAvailable(boolean isAvailable) { this.isAvailable = isAvailable; } @Override public String toString() { return "Book [bookId=" + bookId + ", bookTitle=" + bookTitle + ", bookPrice=" + bookPrice + ", bookLang=" + bookLang + ", isAvailable=" + isAvailable + "]"; } } |
Now we will move to our next step where we will create a utility class for inserting a few Book Objects in an ArrayList.
Step 5: Create a Utility Class for Storing Objects in ArrayList
For our Spring REST web service tutorial, as we are not using a database and want to work with a List to store all book objects, we are creating a utility class which will store some books in a static ArrayList which will be later accessed from DAO layer to perform all CRUD operations.
Below is complete code for our BookRepository.java class:
package com.tutorialspedia.springrest.util; import java.util.ArrayList; import java.util.List; import com.tutorialspedia.springrest.model.Book; public class BookRepository { public static List books; public static List populateBookList() { books=new ArrayList<>(); books.add(new Book(1,"Hello Java",44L, "URDU",true)); books.add(new Book(2,"TutorialsPedia Tutorials",100L, "ENGLISH",true)); books.add(new Book(3,"Arab Dunya",70L, "ARABIC",false)); books.add(new Book(4,"French Fries",30L, "FRENCH",true)); books.add(new Book(5,"My Life",20.5, "ENGLISH",true)); return books; } } |
In the next step, we will implement our DAO layer for performing CRUD operations on our Books List. We are going to follow the bottom up approach and we will first develop our DAO layer and then move to Service and Controller layers subsequently.
Step 6: Create DAO Interface and Implement DAO Class for Spring REST Web Service Tutorial
For our DAO Layer, first we need to create an interface where we will specify all the operations to be performed.
Below is our BookDAO interface which provided method for all CRUD operations for our Spring REST web service.
package com.tutorialspedia.springrest.dao; import java.util.List; import com.tutorialspedia.springrest.model.Book; public interface BookDAO { boolean addBook(Book b); boolean updateBook(Book b); boolean deleteBook(long bookId); Book getBook(long bookId); List getBooks(); } |
Next we need to implement the methods of this interface in our implementation class BookDAOImpl.java
In our DAO implementation class, we are using a static block to populate books list by calling static method of our utility class BookRespository. By this way, we are ensuring that our list is pre-populated when the class is loaded in JVM.
Below is complete code for our DAO Implementation class:
package com.tutorialspedia.springrest.dao; import java.util.List; import org.springframework.stereotype.Component; import com.tutorialspedia.springrest.model.Book; import com.tutorialspedia.springrest.util.BookRepository; @Component public class BookDAOImpl implements BookDAO { static List books=null; static { books=BookRepository.populateBookList(); } public boolean addBook(Book b) { try { books.add(b); } catch(Exception e) { return false; } return true; } public boolean updateBook(Book b) { for (Book book: books) { if (book.getBookId()==b.getBookId()) { book.setBookTitle(b.getBookTitle()); book.setAvailable(b.isAvailable()); book.setBookLang(b.getBookLang()); book.setBookPrice(b.getBookPrice()); return true; } } return false; } public Book getBookById(long bookId) { for (Book b: books) { if (b.getBookId()==bookId) { return b; } } return null; } public List getBooks() { return books; } @Override public Book getBook(long bookId) { for (Book book: books) { if (book.getBookId()==bookId) { return book; } } return null; } @Override public boolean deleteBook(long bookId) { Book b=getBookById(bookId); return books.remove(b); } } |
Now, we will proceed to the next step of implementing service layer.
Step 7: Define Service Interface and Implement Service Class for Spring REST Web Service Tutorial
Service layer is responsible for providing methods to the upper controller layer and also invoking methods of DAO layer to get all the data. We can perform any other service level operations or manipulations at this layer.
For our service layer, we will create an interface which will list all the methods to be used in service layer.
Below is the complete code of our BookService interface:
package com.tutorialspedia.springrest.service; import java.util.List; import com.tutorialspedia.springrest.model.Book; public interface BookService { boolean addBook(com.tutorialspedia.springrest.model.Book b); boolean updateBook(Book b); boolean deleteBook(long bookId); Book getBook(long bookId); List getBooks(); } |
Next we need to create an implementation class and implement all the methods of the service interface.
The methods of our implementation class will call respective DAO methods to perform CRUD operations. The service class is annotated with @Service annotation. For calling methods of DAO class, we are also using @Autowired annotation to achieve dependency injection.
Below is the complete code for our BookService implementation class:
package com.tutorialspedia.springrest.service; import java.util.List; import org.springframework.beans.factory.annotation.Autowired; import org.springframework.stereotype.Service; import com.tutorialspedia.springrest.dao.BookDAO; import com.tutorialspedia.springrest.model.Book; @Service("bookservice") public class BookServiceImpl implements BookService { @Autowired BookDAO bookdao; public boolean addBook(Book b) { return bookdao.addBook(b); } public boolean updateBook(Book b) { return bookdao.updateBook(b); } public boolean deleteBook(long bookId) { return bookdao.deleteBook(bookId); } public List getBooks() { return bookdao.getBooks(); } @Override public Book getBook(long bookId) { return bookdao.getBook(bookId); } } |
Now we can proceed to our next and major step of implementing our Controller Layer.
Step 8: Implement REST Controller Class for Spring REST Web Service Tutorial
Controller class is the backbone of our REST web service as this class is on the driving seat to receive client calls and executing different methods based on HTTP VERB, URL string and it will invoke service layer methods accordingly.
This controller class has the logic for acceptable media types for request & response payloads and Response along with header and payload will be created and returned using this class.
Below are some of the major actions performed in this controller class for our Spring REST web service tutorial:
• Class is marked as a REST controller by using @RestController annotation.
• Methods for HTTP GET verb are implemented by specifying @GetMapping Annotation and URL is specified by Value attribute. Response payload type is specified using Produces array. In our case we are specifying both XML and JSON Media Types which means that our implementation can return both type of payloads as per client preferences.
• We are using @PathVariable annotation for getting path parameters to return Book data for a specific book id.
• BookService object is created using @Autowired annotation to benefit from Spring Dependency Injection feature.
• We are using ResponseEntity class for producing response object having data and header (status code).
• For our POST method implementation, we are using @RequestBody annotation and map request payload to Book Object.
• Using an array of acceptable payload types, we are allowing client to send both JSON and XML as payload for adding new books or updating any existing book.
Below is complete code of our controller class BookController.java:
package com.tutorialspedia.springrest.controller; import java.util.List; import org.springframework.beans.factory.annotation.Autowired; import org.springframework.http.HttpStatus; import org.springframework.http.MediaType; import org.springframework.http.ResponseEntity; import org.springframework.web.bind.annotation.DeleteMapping; import org.springframework.web.bind.annotation.GetMapping; import org.springframework.web.bind.annotation.PathVariable; import org.springframework.web.bind.annotation.PostMapping; import org.springframework.web.bind.annotation.PutMapping; import org.springframework.web.bind.annotation.RequestBody; import org.springframework.web.bind.annotation.RestController; import org.springframework.web.util.UriComponentsBuilder; import com.tutorialspedia.springrest.model.Book; import com.tutorialspedia.springrest.service.BookService; @RestController public class bookController { @Autowired BookService bookservice; @GetMapping(value="/books", produces= {MediaType.APPLICATION_XML_VALUE,MediaType.APPLICATION_JSON_VALUE}) public ResponseEntity > getAllBooks() { List books=bookservice.getBooks(); HttpStatus ResponseHTTPStatus= (books.size() > 0) ? HttpStatus.OK: HttpStatus.NO_CONTENT; return new ResponseEntity<List>(books, ResponseHTTPStatus); } @GetMapping(value="/book/{bookId}",produces= {MediaType.APPLICATION_XML_VALUE,MediaType.APPLICATION_JSON_VALUE}) public ResponseEntity getBook(@PathVariable("bookId") String bookId) { Book b=bookservice.getBook(Long.parseLong(bookId)); HttpStatus ResponseHTTPStatus= (b.getBookTitle().length() > 0) ? HttpStatus.OK: HttpStatus.NO_CONTENT; return new ResponseEntity (b, ResponseHTTPStatus); } @PostMapping(value = "/book/", consumes = {MediaType.APPLICATION_JSON_VALUE,MediaType.APPLICATION_XML_VALUE}) public ResponseEntity AddBook(@RequestBody Book b,UriComponentsBuilder ucBuilder) { boolean result=bookservice.addBook(b); HttpStatus ResponseHTTPStatus= (result==true) ? HttpStatus.CREATED: HttpStatus.BAD_REQUEST; return new ResponseEntity(ResponseHTTPStatus); } @PutMapping(value="/book/", consumes = {MediaType.APPLICATION_JSON_VALUE,MediaType.APPLICATION_XML_VALUE}) public ResponseEntity UpdateBook(@RequestBody Book b) { boolean result=bookservice.updateBook(b); HttpStatus ResponseHTTPStatus= (result==true) ? HttpStatus.OK: HttpStatus.BAD_REQUEST; return new ResponseEntity(ResponseHTTPStatus); } @DeleteMapping(value="/book/{bookId}") public ResponseEntity deleteBook(@PathVariable("bookId") long bookId) { boolean result=bookservice.deleteBook(bookId); HttpStatus ResponseHTTPStatus= (result==true) ? HttpStatus.OK: HttpStatus.FORBIDDEN; return new ResponseEntity(ResponseHTTPStatus); } } |
Now we are done with the implementation of our Spring REST web service. We are now ready to proceed to our last step of testing our Restful web service.
Step 9: Test Spring REST Web Service Using Postman as Client
With all the implementation done, you can run the application in the server and test it from any client. In my case I have run the application in tomcat server and will use Postman as a client.
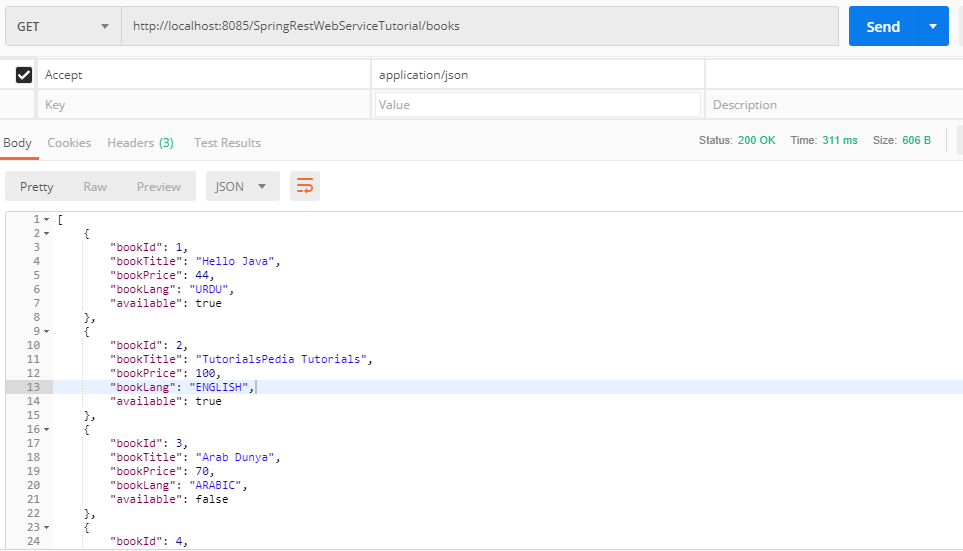
For getting all the books using GET method and specifying application/json as Accept type, I got the response as below:
You can add a new book by using a POST method with URL http://localhost:8085/SpringRestWebServiceTutorial/book/
For this, you can send JSON or XML data from client as our service accepts both types.
The sample XML I sent is below:
300 Hello Pakistan 43 ENGLISH true |
For updating an existing book, I sent a PUT request to the URL: http://localhost:8085/SpringRestWebServiceTutorial/book/
The sample JSON that I sent for this PUT request is as below:
{
"bookId": 5,
"bookTitle": "How to Develop REST Services Using Spring",
"bookPrice": 30,
"bookLang": "LATIN",
"available": true
} |
Lastly to test DELETE operation I sent request to below URL to delete the book with book id 5:
http://localhost:8085/SpringRestWebServiceTutorial/book/5
After performing all the CRUD operations as above, when I sent GET request again to get all the books, here is the final output in JSON format:
[
{
"bookId": 1,
"bookTitle": "Hello Java",
"bookPrice": 44,
"bookLang": "URDU",
"available": true
},
{
"bookId": 2,
"bookTitle": "TutorialsPedia Tutorials",
"bookPrice": 100,
"bookLang": "ENGLISH",
"available": true
},
{
"bookId": 3,
"bookTitle": "Arab Dunya",
"bookPrice": 70,
"bookLang": "ARABIC",
"available": false
},
{
"bookId": 4,
"bookTitle": "French Fries",
"bookPrice": 30,
"bookLang": "FRENCH",
"available": true
},
{
"bookId": 300,
"bookTitle": "Hello Pakistan",
"bookPrice": 43,
"bookLang": "ENGLISH",
"available": true
}
] |
This completes our step by step turorial for developing Restful web service using Spring framework with support of JSON and XML both.
If you have any comments or any queries, you can write in the comment section to get answered.