For invoking any SSL based secured REST API from TIBCO BW6 processes requires certain steps involving configurations of related resources before using Invoke REST API activity in BW Process. In this step by step tutorial, I will explain how we can configure HTTPClinet Resource, Keystore provider resource and SSL Client Resource and then consume REST API to get response in JSON Format.
TIBCO BW6 Invoke REST API Tutorial Sample Scenario
For this step by step tutorial, we will implement a very simple scenario where we will implement a process which runs every 5 minutes and invokes a publicly available REST API and response data is saved in a file.
We will use a publicly available REST API https://jsonplaceholder.typicode.com/users/ for our tutorial. This public API returns users list in JSON format.
TIBCO BW6 Consume REST API Tutorial Step 1: Create JKS File and Configure Keystore Provider Resource
In order to consume SSL based REST API, we first need to create a Key store file and import certificate chain of API in that keystore. I have already explained in a video tutorial on Youtube Channel of TutorialsPedia about how to generate JKS Keystore.
Once a JKS Keystore has been created, we will be required to import certificate chain of this public API in the keystore. For that, first download certificate chain of jsonplaceholder site using any browser. Next import these certificates into the created keystore file.
E.g. below command will be used to import certificate 1.pem to the keystore file ajmal.jks:
keytool -importcert -alias 1 -keystore C:/Test/ajmal.jks -file C:/Test/1.pem
Make sure that you import root, intermediate certificate as well so that whole chain is imported into the keystore file.
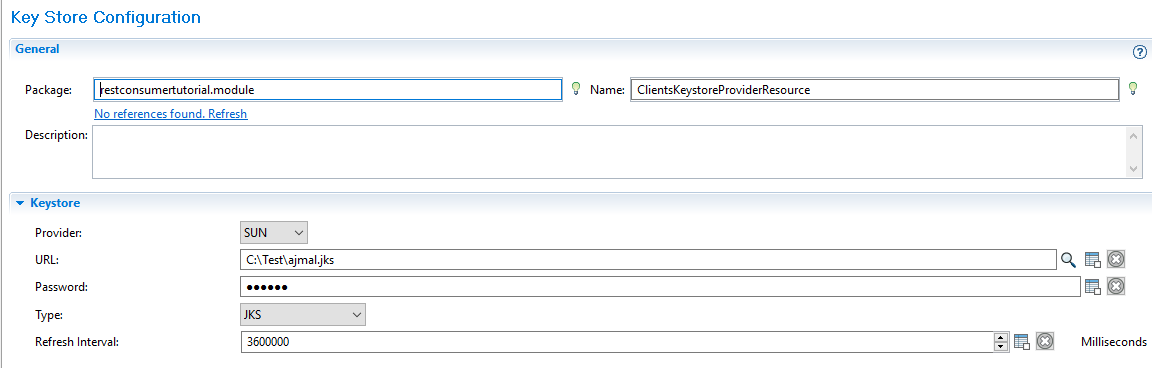
Once we have imported all certificates in the keystore file, we can now add KeystoreProvider resource in our project and configure it by specifying the JKS Keystore file along with its password as below:
TIBCO BW6 Consume REST API Tutorial Step 2: Configure SSL Client Resource
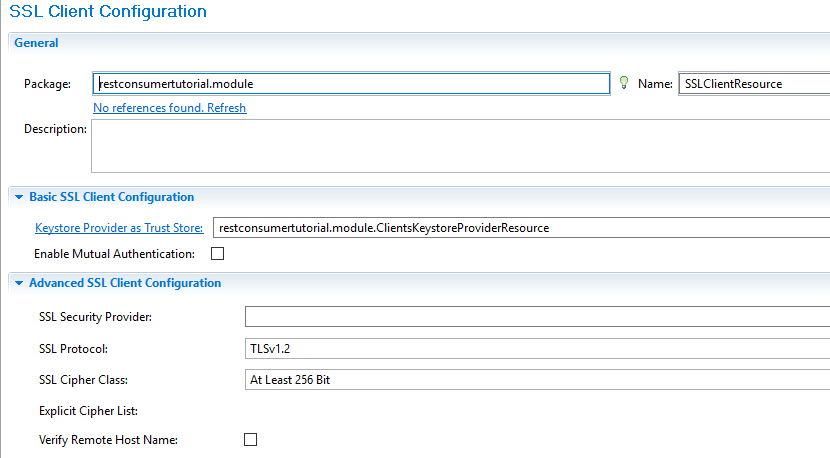
Our second step for TIBCO BW6 Consume REST Web Service tutorial is to configure SSL Client Resource. Add this shared resource in the project and configure it as below. For Basic SSL Client configurations, provide reference to the keystore provider that was created in step 1 as it will act as truststore.
TIBCO BW6 Consume REST API Tutorial Step 3: Configure HTTP Client Resource
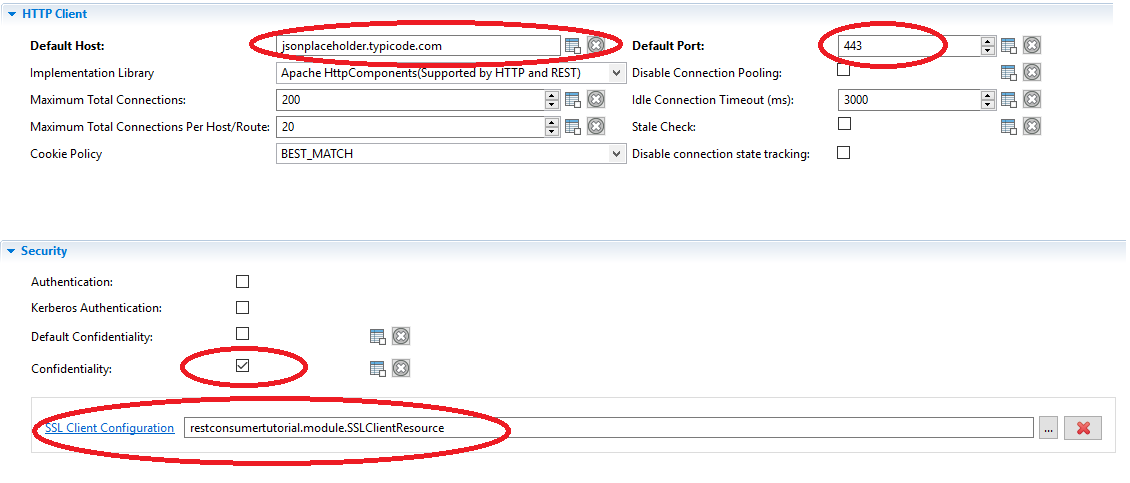
With Keystore and SSL Client configurations done in previous steps, now we will configure HTTP Client Resource where we will specify the host name of the API server along with its port and after checking Confidentiality checkbox, we will also provide a reference to SSL Client Resource which was created by us in Step 2.
TIBCO BW6 Consume REST API Tutorial Step 4: Invoke REST API Using TIBCO BW6 Process
Now we need to implement a simple process to consume REST GET operation using Invoke REST API activity from REST Palette. The Process is very simple as it just starts with a timer to run every two minutes and invoke a public REST API and save the response JSON in a file with append option so that same file gets updated every time with new data appended. To keep it simple, I haven’t added any advanced things and even no exception handling is done.
Below is the process with Invoke REST API Configured to access /users resource from the public API configured using HTTP Client Resource earlier in another step.
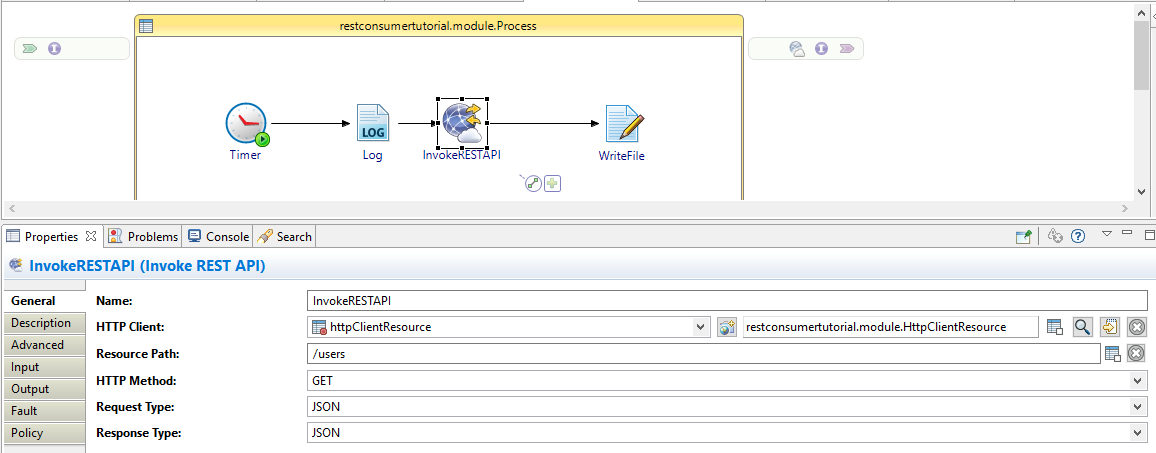
In the Write File activity, I have just specified a txt file and I am appending current dateTime along with the output of invoke REST API activity so that content gets saved in same file every time API is consumed.
TIBCO BW6 Consume REST API Tutorial Step 7: Test TIBCO BW6 Process with Consume REST API Activity
With all configurations done for our process, simply run the process in Business Studio and you should be able to see the content written in the configured text file with the timestamp information. Since we have configured Timer to run every two minutes, you should be able to see file getting updated every two minutes with new content appended.
So, we come to an end of this simple use case implementation for TIBCO BW6 Invoke REST API. Feel free to comment below if you have any queries.
Pingback: TIBCO BW6 SSL Rest Web Service Tutorial: One Way & Two Way SSL in BW6 REST Service | TutorialsPedia
which path we should execute this step
keytool -importcert -alias 1 -keystore C:/Test/ajmal.jks -file C:/Test/1.pem