MuleSoft AnyPoint Platform provides a rich set of tools and features to design APIs, Publish APIs to Exchange, Deploy APIs to MuleSoft Managed cloud environment (Cloudhub) and apply different API governance policies for exposed APIs using API Manager.
In this post, we will explain how we can design API Specifications in Visual Editor using Design Center in MuleSoft AnyPoint Platform, how to publish an API to Exchange, how to Define API Proxy using API Manager and how to apply rate limiting and other policies for any deployed APIs.
MuleSoft API Tutorial: How to Design API in Design Center Using Visual Editor
In MuleSoft AnyPoint Platform, you can use Design Center for creating Integration Applications or API Specifications. Designing API Specification is one of the stages of MuleSoft API Life Cycle Management. For API Specifications, you can either go with Text Editor approach where you will be writing RAML Specifications in a code editor yourself or else you can go with Visual Editor approach where you will be designing API Specifications visually by following available options of adding data types, resources, endpoints, request & response elements for different HTTP methods and other API related details.
Note: If you prefer to watch this MuleSoft API manager Tutorial in Video format, refer to below video on TutorialsPedia YouTube channel
If you prefer to proceed with tutorial in Text format–Keep reading.
Below are the steps explained briefly about using MuleSoft Design Center to create API Specifications:
- Login to AnyPoint Platform with your registered username and password. (You can use a trial account if you don’t have a full fledged account).
- From the menu, choose Design Center and click on Create New and then choose Create API Specification
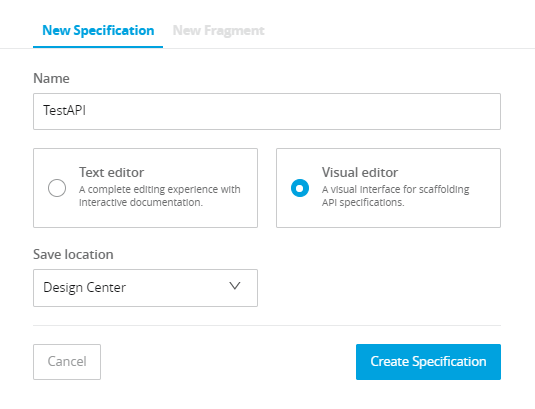
- Provide a name for your API and choose Visual editor.
- Now you will be seeing API Summary page where you need to provide inputs for API Title, Version, Protocol, supported media type as well as any other details like descriptions etc.
- In the left hand side, you will see options to add Data Types, Resources, Security Schemas etc. If you want to use any custom object as data type, create that using DATA TYPES option. You will have add all properties one by one for your object to create a complex custom data type.
- Next you will need to add Resources by clicking on + button for RESOURCES and then you will be able to add different HTTP Verbs (Methods) for your resource like GET, POST, PUT, DELETE etc. For each method, specify the details including request & response data types.
- If you want to use Mocking Service, don’t forget to turn on Mocking Service by dragging the slider. You will observe that RAML specification gets updated with mocking URL once you enable mocking service.
All the changes that you make using Visual editor through above steps, get reflected immediately in RAML file that you can see on the right side of your screen. Any errors that occur will also be shown immediately for you to look and rectify.
Once you have completed designing your API in Design Center, you can publish it to Exchange by clicking on Publish button.
How to Create API Proxy and Apply API Rate Limiting Policy on MuleSoft APIs
MuleSoft AnyPoint Platform provides API Manager component which is equipped with all required features which are part of any sophisticated API Management Platform including options to design and publish API Proxy, Applying Policies to APIs, Managing and controlling APIs and analyzing APIs statistics through Analytics dashboards.
For an API which is already published to MuleSoft Exchange, you can create API Proxy in MuleSoft API Manager by choosing Manage API From Exchange and then selecting the API which you want to manage through API Manager.
In the Managing Type, choose Endpoint with Proxy and in the Proxy deployment target choose Cloudhub as we want to use MuleSoft managed cloudhub in this scenario.
Once you have populated all details as explained in the video tutorial and saved, in the next page you will be able to deploy your API Proxy and once it has been deployed and started successfully, you should be able to see the status in Runtime Manager as started. I am skipping details here as all the steps with detailed explanation are already covered in video tutorial.
For applying API Policy (or many policies) to an API, you need to click on desired API instance and then choose Policies option from the left side menu. Now in order to add API level policies, you will need to click on Apply New Policy and you will be able to see various policies available in different categories which you can choose and apply for your API. E.g. if you want to do the throttling (rate limiting) for your API to control the number of calls to API methods, you can choose Rate Limiting Policy for Quality of Service category and define your policy as per your requirements.
Once you have policies defined for your API and saved, you should be able to see the effect of policies by invoking your API operations.
That’s it from this MuleSoft API Manager tutorial. If you have any questions, feel free to comment below. You can refer to MuleSoft Tutorials PlayList on TutorialsPedia YouTube channel to watch videos on various MuleSoft topics.
Recommended Reading: MuleSoft RAML tutorial: How to Design MuleSoft API using RAML

