In BW5, REST & JSON Plugin is required if you want to develop a REST service as I explained in BW5 REST Service Tutorial. However, in BW6, TIBCO has provided direct support for REST services and you can design and develop REST based services without need of any additional plugins. In this post, I will explain step by step how to Develop REST Service in TIBCO BW6.
Example Scenario for BW6 REST Web Service Step by Step Tutorial
In order to keep things simple and brief, we will use a simple scenario here for a REST web service with POST and GET Methods implemented. For this test service, GET method will return employee data in JSON format when queried with a specific parameter and will return an error in all other cases. The POST method will receive employee data in XML format, save it into a file and will return a message stating that the data has been saved successfully.
This scenario is based on plain HTTP connection without SSL. If you want to learn HTTPS REST Web Service in TIBCO BW6, You can refer to my other tutorial explaining how to implement SSL Based Secure REST Web Service in TIBCO BW6 in which I explained how to use one-way SSL and Two-Way SSL in TIBCO BW6 for a Restful web service.
Now, let us start developing BW6 REST service to implement the above scenario.
Note:
If you prefer to watch a video tutorial on BW6 REST Web Service implementation with a different scenario implemented, you can watch the below video on YouTube channel of TutorialsPedia where I have explained how we can implement User Management Scenario with a REST Web Service in TIBCO BW6.
If you want to continue with Employee Web Service scenario implementation, continue reading below tutorial.
Step 1: Create BW6 Project and Add Employee Schema for REST service
In Business Studio create a new project using the wizard and name the project as TutorialsPediaRESTTutorial. Keep everything as default at every step in the wizard. Once the project and project module has been created, delete the process (Process.bwp) which automatically got created under the TutorialsPediaRESTTutorial.module as we will develop our own from scratch.
For this tutorial example scenario as explained above, we need to create a XSD for Employee which will be used in our REST implementation in the subsequent steps. XML Schema will be created under Schemas folder.
Schema is as shown below:
<?xml version=”1.0″ encoding=”UTF-8″?>
<schema xmlns=”http://www.w3.org/2001/XMLSchema” targetNamespace=”http://www.example.org/TestSchema” xmlns:tns=”http://www.example.org/TestSchema” elementFormDefault=”qualified”>
<element name=”Employees”>
<complexType>
<sequence>
<element name=”Employee”>
<complexType>
<sequence>
<element name=”EmpName” type=”string”></element>
<element name=”EmpAge” type=”int”></element>
<element name=”EmpDesignation” type=”string”
minOccurs=”0″>
</element>
<element name=”EmpSkills”
type=”tns:EmpSkillsType”>
</element>
</sequence>
</complexType>
</element>
</sequence>
</complexType>
</element>
<complexType name=”EmpSkillsType”>
<sequence>
<element name=”SkillID” type=”int”></element>
<element name=”SkillName” type=”string”></element>
</sequence>
</complexType>
</schema>
With the above schema source, you will get the required structure for our XSD.
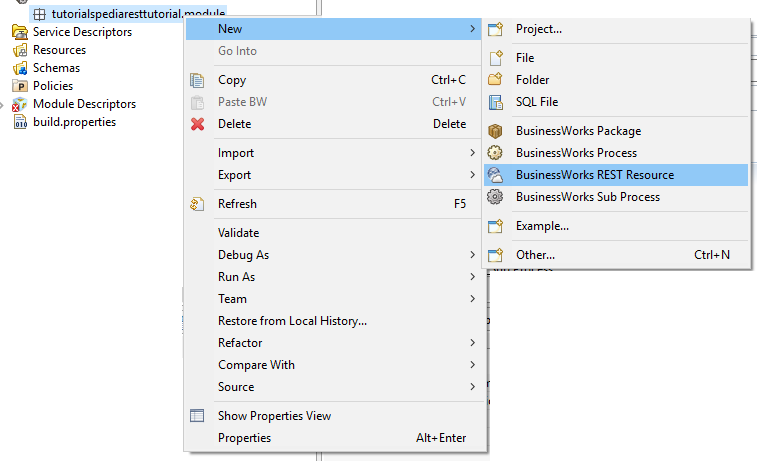
Step 2: Add REST Resource in BW6 Project
Right Click on the module and choose New–>BusinessWorks REST Resource as shown in the screenshot below:
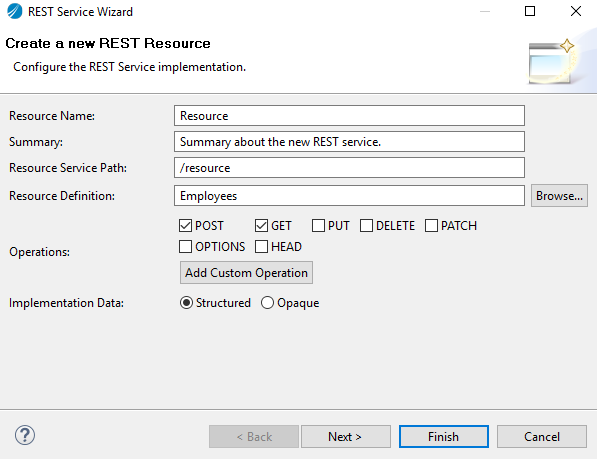
A new wizard will open which will provide you options to configure the REST resource in your BW6 project. Specify resource name, resource path, methods to be included as part of this REST service. For Resource Data, we will browse and choose EmployeeSchema that will be used as an input for POST method and same schema will serve as output in case of GET method. We have already created this schema in our previous step so we can simply browse and choose.
Once all required settings are done on this window for configuring REST resource, It will look like below:
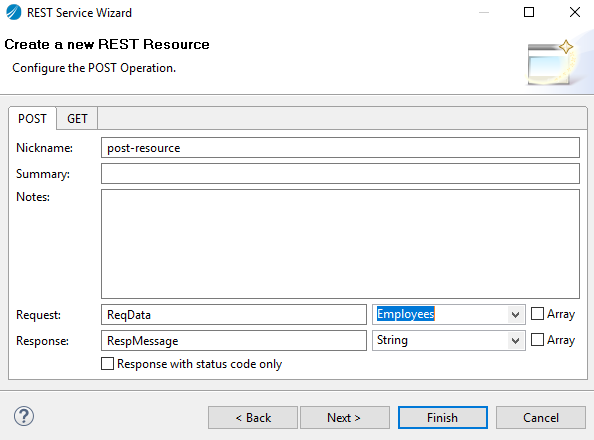
Click Next and now we need to configure POST and GET operations for our service. For POST, since we want clients to post employee data as in input and we want to return a message in string format as a response, we will configure it accordingly as seen below:
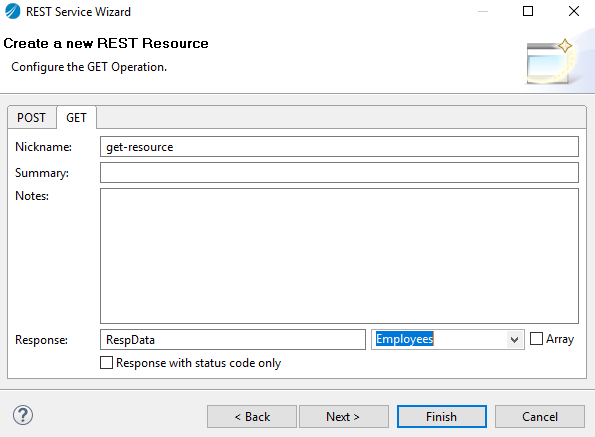
For GET method, since we want to return employee data as a response when the operation is invoked, we will choose employee schema for the response as shown in the below screenshot:
In the next window, you will be able to choose process folder and package and also you can specify name of the implementation process here. For the sake of simplicity, I will keep the settings as-is for this so that a process with the name Resource is created. Click Finish and now you will be able to see the new process skeleton created as shown below:
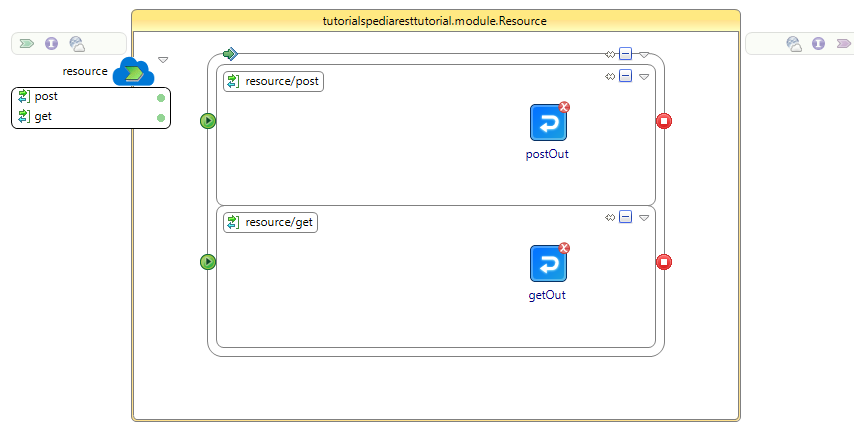
Now we can proceed to the next step of implementing these POST and GET methods for our BW6 REST Service.
Step 3: Implement POST and GET methods for BW6 REST Service
For the POST operation, we will add a Write File activity to write the data to a file where file name will be same as the name of the employee and payload received as POST body will be written to this XML file.
Input mapping for the Write File activity is as shown below:

For the reply that we need to send back for the POST request, we will just write a simple string stating that data has been saved for the specified employee.

We won’t handle any exceptions here and will just consider the happy scenario.
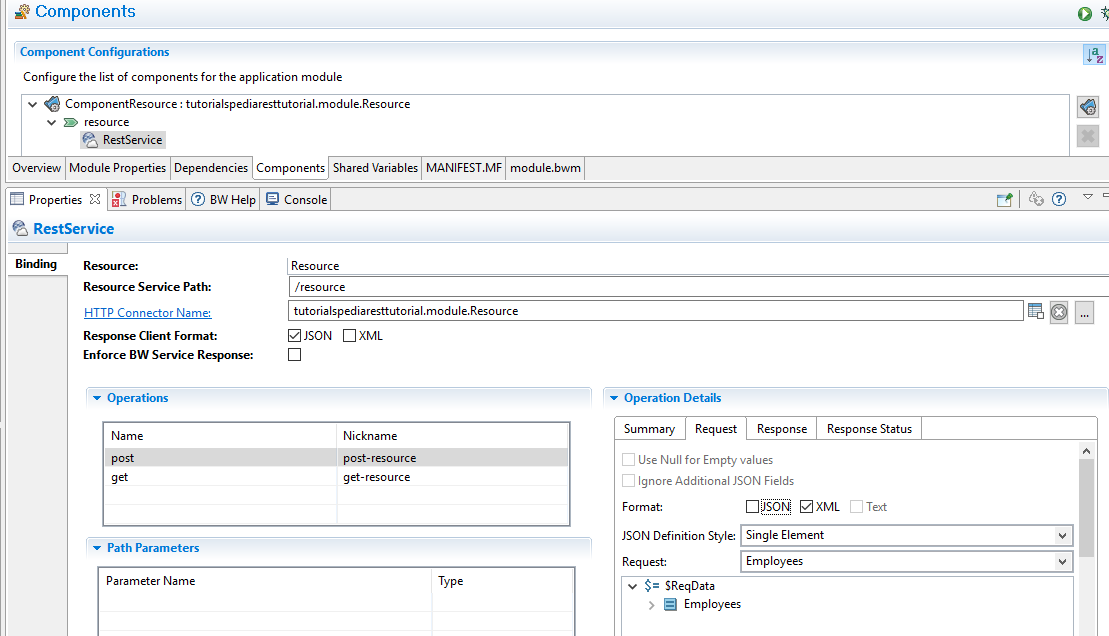
Next we need to do binding related settings for this POST method. Go to Components tab for module and here we first need to choose HTTP connection to be used for our service. Specify a Host and Port for the connection while creating it and then refer to this newly created connection. For the POST method, under operation details, choose XML checkbox for the request as shown below:
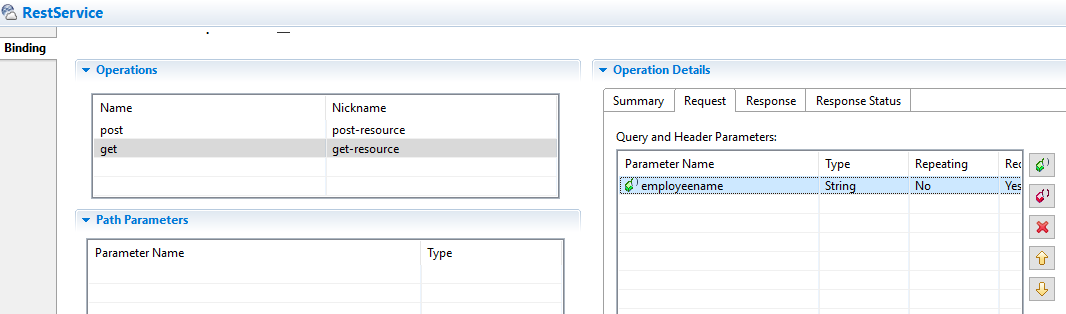
Next we need to implement GET method of our service. We want to return a success response and employee details in JSON format, only if user queries for the employee with the name “Ajmal” and we will return a 404 error in all other cases. Obviously this is not a practical scenario but for the sake of simplicity, we are doing it like this.
We need to add one query parameter for GET method with the name “employeename” so that user can pass this parameter when calling our service method. To define this query parameter, go to binding tab in the module and define the parameter for GET method as shown below:
Since we aim to send 404 error for any query if the query parameter isn’t “Ajmal“, we need to define 404 status code as well in the Response Status tab for the binding of this GET method under Operation Details.
Since we need to respond back with JSON format data of the employee, check JSON checkbox in the binding for Response Client Format option.
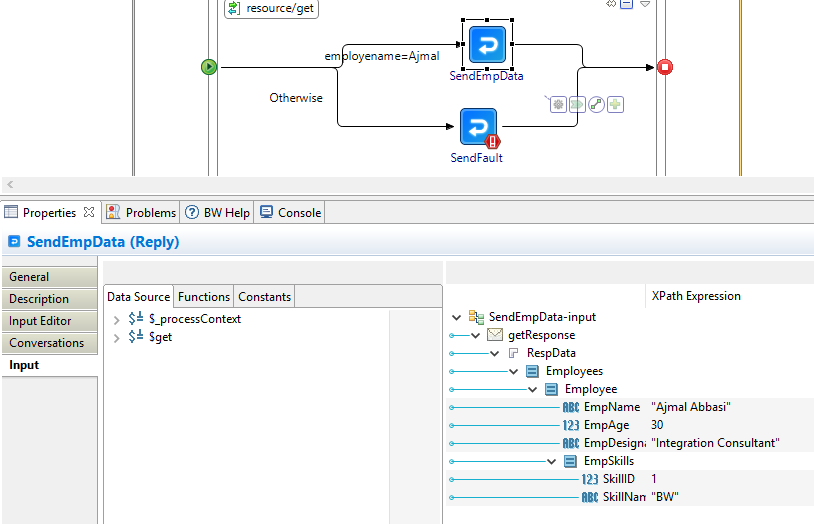
In the Resource.bwp process, for GET method, we define two Reply activities–one for sending 404 error with a custom error message and another for valid scenario to return employee details (hard coded).
Below is the input mapping for the success scenario where we are sending hard-coded employee details as a response:
And below is the configuration of reply activity for sending 404 message:

This completes implementation part of our service and now we can proceed to the next step of testing TIBCO6 REST web service.
Step 4: Test BW6 REST Service POST and GET Methods
To test the REST service, we first need to deploy the service or run it in debug mode. Once loaded in debug mode, you can use any client tool to hit the service. I will use REST features of SOAP UI to test it but you can use Postman or any tool of your choice.
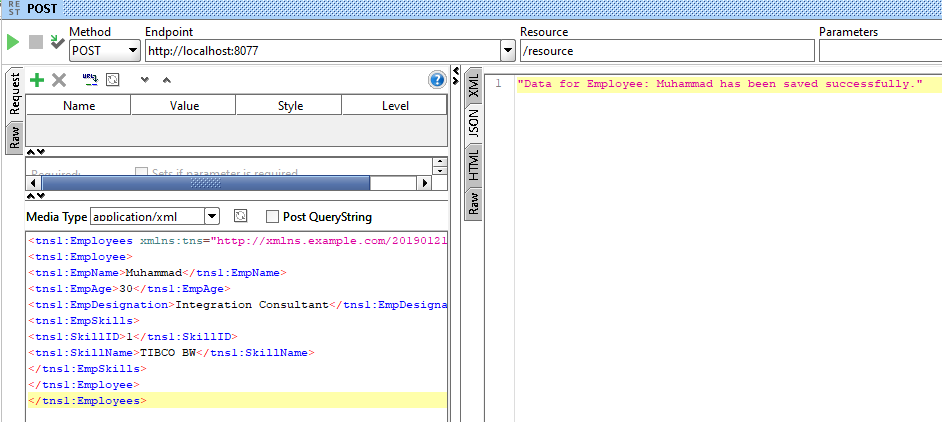
For the POST operation, as you can see below, I posted Employee Data and got the success response with the message stating that data is saved for this employee:
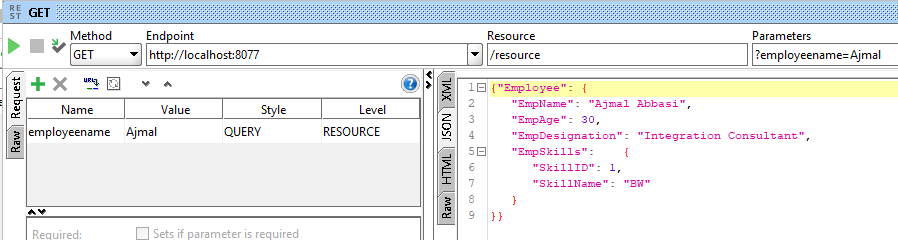
And for the GET method, when I tested with the query parameter as Ajmal for a success scenario, you can see below that I received back response data in JSON format as required:
If we try with query parameter with argument anything other than Ajmal, we will get the response with 404 Status Code and the custom message stating that data is not found for this employee.
With this we come to the end of this step by step tibco bw6 tutorial for REST web service. For BW6 SOAP based web service development, If you are interested, You can see other tutorial to develop SOAP Web service using BW6.
Feel free to comment below for any confusions.
Can you please help to provide the POST application/xml input needed for SOAP UI to post to the REST service?
How can we generate this xml ?
Too late but I thought it could of help to someone. This worked for me, both on Postman & SoapUI. Enter the name of your Schema in line 1
greg
33
Consultant
1
TIBCO BW
Too late but I thought it could of help to someone. This worked for me, both on Postman & SoapUI. Enter the name of your Schema in line 1
greg
33
Consultant
1
TIBCO BW
can you please show put and delete operation in bw6