TIBCO BW provides a rich set of palette activities along with many process starter activities which can be used while developing BW based processes & services and such process starters act as process instance initiators as on the basis of triggering of respective events. E.g. HTTP Receiver process starter starts a process when HTTP request is received on the given host & port, JMS Receiver based process starts once a message becomes available in the specified JMS queue. Thanks to the feature-rich yet flexible architecture of TIBCO BusinessWorks, It provides us options to implement our own custom process starters when and where needed by using Java Event Source Process Starter activity available under Java Palette.
In this TIBCO Java Event Source tutorial, I will explain step by step how to use Java Event Source and implement a process with our custom java process starter.
When to Use Java Event Source Custom Process Starter?
As a best practice, we should always prefer using readily available and industry-wise used palette activities and process starters when and where we can use them and avoid using our custom java code as much as we can as custom java code implemented by different developers might not be well optimized and might not be following same set of standards. However, we can always come across situations where it becomes necessary for us to do any custom implementations and for such cases, use of Java palette activities including Java Event Source becomes our only choice.
We can use Java Custom Process Starter (Java Event Source activity) in scenarios where any of the readily available process starter doesn’t fulfil our needs and we want to start our BW process based on our own custom conditions. E.g. suppose you want to start a BW process based on messages in Rabbit MQ queue (TIBCO does provide plugin for this but just in case if you don’t have that or if you want to utilize your java code for this with own customization).
Above is just one example and depending on your business needs, you might come across other scenarios where use of custom java process starter can become a great choice for you.
Now let us move towards practical implementation of a simple use-case by using Java Event Source custom process starter.
Example Use Case Implementation for Java Event Source Tutorial
For this tutorial, a simple use case will be implemented where we will have a TIBCO BW process with custom process starter using Java Event source where we will get a new object of a User Class every 15 Seconds. This might not seem to be a practical use case but It is sufficient enough to give you a practical idea of how things work for custom process starter.
Step 1: Create a Simple Java Class (User Class) And Add it to Class Path
As stated above in the description of the use case, our process will generate an object of User class every 15 seconds so we need a POJO class for User which will contain User properties and associated getter & setter methods.
Below is the complete code for our Users.Java class:
package abc; public class Users implements java.io.Serializable { private int userId; private String userName; private double userBalance; public Users() { } public Users (int uId, String uName, double uBalance) { userId=uId; userName=uName; userBalance=uBalance; } public int getUserId() { return userId; } public String getUserName() { return userName; } public double getUserBalance() { return userBalance; } public void setUserId(int userId) { this.userId = userId; } public void setUserName(String userName) { this.userName = userName; } public void setUserBalance(double userBalance) { this.userBalance = userBalance; } public static void main(String args[]) { } } |
You can compile the class with below command (abc is the package name used in our java code):
javac abc\Users.java
The above command will compile the code and create a .class file for our class
Now you need to create a jar file for your class using below command:
jar cvf UserJar.jar abc\*.class
Once jar file has been created, you can add it to the class path by adding it to the lib folder under tibco/tpcl/<<version>>/lib
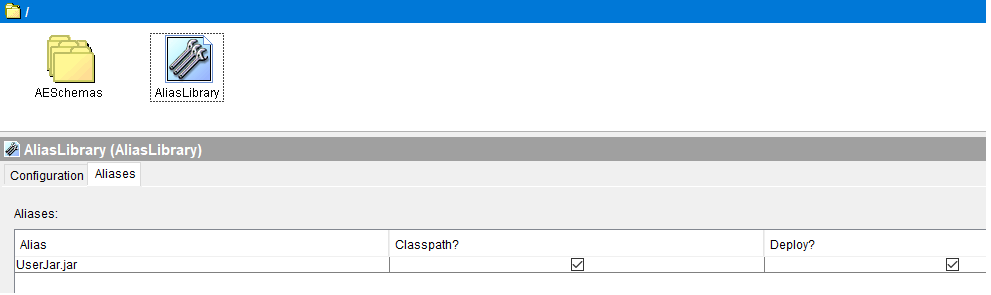
Alternatively it is also possible to add the folder of your jar file where your jar file is available to the class path by updating bwengine and designer tra files. Since we will also use Java to XML activity later in our process for converting java object into XML format, we need to use Alias Library option which will also make the jar available in the class path.
For this purpose, create an Alias Library and under Aliases tab, add the jar file that you created above. Make sure that Classpath checkbox and Deploy checkbox are checked.
Step 2: Implement TIBCO Process using Java Event Source Custom Process Starter
Create a new process in TIBCO Designer and add Java Event Source Process Starter from Java Palette. For Java Event source, we can either implement the process starter class externally and use it by choosing “Use External Class” option. But for our tutorial, we will implement the class under the Code tab in our process itself. Our process starter class needs to extend JavaProcessStarter abstract class and implement its methods to make our class a custom process starter.
From our class, we will start a new thread using a static class and will create an object of User class (which is available in the classpath by the jar we created in previous step). We will use Random class and randomly assign values for user object properties.
The event gets triggered by onEvent method of JavaProcessStarter class and process receives the object passed to this method as parameter.
Below is complete code of our class implemented unde Code tab extending abstract JavaProcessStarter class:
package CustomJavaEventStarter; import java.util.*; import abc.*; import com.tibco.plugin.java.JavaProcessStarter; import org.apache.log4j.Logger; public class CustomJavaEventStarter extends JavaProcessStarter { private static final Logger LOGGER = Logger.getLogger("bw.logger"); //Logger to perform any message logging public UserHandler uh=null; public CustomJavaEventStarter() { } //create User Instance in this init method public void init() throws Exception { uh=new UserHandler(this); } // In this startup method, implmenent logic to start a new thread for user handler class public void onStart() throws Exception { LOGGER.info("Custom Event Started"); Thread t=new Thread(uh); //Create a new Thread for UserHandler class t.start(); } public void onStop() throws Exception { } public void onShutdown() { } public static class UserHandler implements Runnable { JavaProcessStarter starter=null; UserHandler(JavaProcessStarter p) { starter=p; } public void run() { try{ while (true) { Random r=new Random(); int randomNumber=r.nextInt(100); // Users u=new Users(randomNumber,"User:"+randomNumber, randomNumber * 0.3); starter.onEvent(u); //Sleep the thread for 15 seconds Thread.sleep(15000); } } catch (Exception e) { LOGGER.info("Error"); } } } } |
In order to convert User Object into XML format, we will use Java To XML activity from Java Palette. Under configuration tab of this activity, choose Alias Library and then choose the class (abc.Users in our case).
Under the Input tab, map the output of Java Event Source to the input of this activity as you can see below:

With these configurations, we expect Users properties available in XML format as output of this Java to XML activity. In real scenarios, we will have additional activities after this to do any actions based on the data received but for the sake of simplicity, we won’t do any action here and will move to the next step of testing.
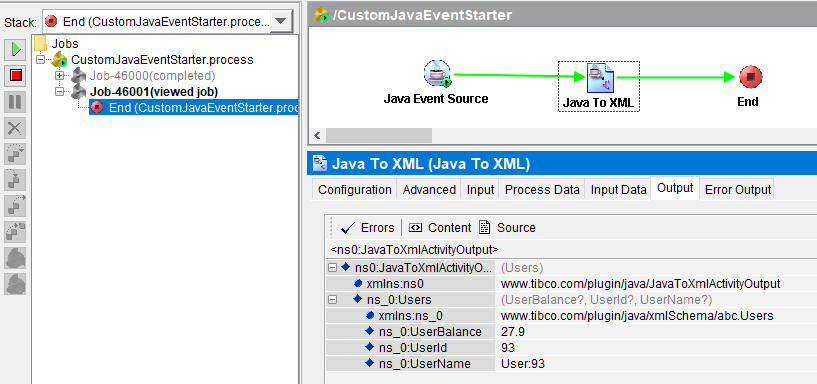
Step 3: Test Java Custom Starter TIBCO BW Process
Before running the process with designer tester, make sure that you compile the code for Java Event Source. Once compilation is successful, load the process in designer tester and you should see a new object received every 15 seconds with random data as shown below:
This completes our step by step tutorial for Java Event Source custom process starter. Feel free to comment below if you have any confusion.
need help
i got an error
C:\Users\ANDI OGIE\javaCode\CustomJavaEventStarter.java:3: error: package abc does not exist
import abc.*;
^
C:\Users\ANDI OGIE\javaCode\CustomJavaEventStarter.java:46: error: cannot find symbol
Users u=new Users(randomNumber,”User:”+randomNumber, randomNumber * 0.3);
^
symbol: class Users
location: class UserHandler
C:\Users\ANDI OGIE\javaCode\CustomJavaEventStarter.java:46: error: cannot find symbol
Users u=new Users(randomNumber,”User:”+randomNumber, randomNumber * 0.3);
^
symbol: class Users
location: class UserHandler
3 errors
Done
Problem Solved
I using generate Class with :
javac -source 8 -target 13 abc\Users.java
because versioning
thanks