SSL (Secure Sockets Layer) is a standard security technology used for establishing an encrypted link between a web server and a client. SSL encryption technology works on two key principle–a Public key known to every one and a Private key which is known only to the intended recipient. SSL based secure communication is enabled by the use of SSL Certificates.
In TIBCO, security is of a prime concern when integrating different applications and services. Communication between different applications over the network in a safe and secure manner is enabled by the use of certification mechanism of SSL. The other options available to implement security in TIBCO Services is by using LDAP based authentication or simple username, password based authentication.
In this TIBCO SSL Certificate Step by Step tutorial, I will explain how we can use a Self Signed Certificate for SSL communication in TIBCO. However in real time scenarios, you won’t be using self signed certificates; rather you will go for a CA (Certificate Authority) signed certificate.
Self Signed Certificates are useful only for testing purpose while developing secure services in TIBCO.
Step 1: Create a Certificate in TIBCO using JAVA Keytool
Keytool is a utility provided by JAVA SDK to create your own SSL certificates. Keytool can be found inside your JAVA installation in your machine. In my case; I have keytool utility available at the following path:
C:\tibco\jre\1.6.0\bin
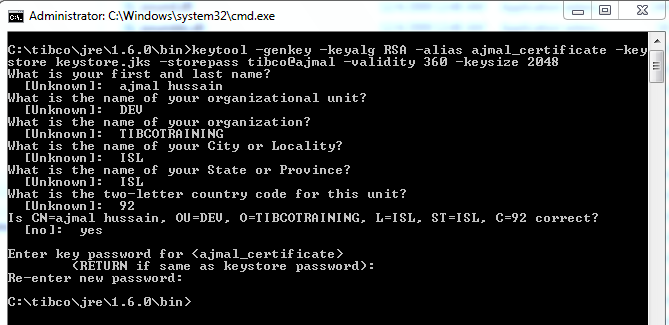
To generate a key file with both Public and Private keys; use following command:
keytool -genkey -keyalg RSA -alias ajmal_certificate -keystore keystore.jks -storepass tibco@ajmal -validity 360 -keysize 2048
- alias is used to give a name to your key. It should be unique for its purpose. Here it is ajmal_certificate.
- keyalg is encryption algorithm type. Here it is RSA.
- storepass is the password affiliated to the repository. Here it is tibco@ajmal
- keystore.jks is name of the file which acts as repository keys.
- validity specified as 360 means this certificate will remain valid for 360 days.
When you run this command, you are asked some questions like your organization name, your full name etc. Just give some values for these and a file keystore.jks will be created which will have both Public and Private keys in it.
Recommend Video: How to use OpenSSL to create self signed certificates
Step 2: Export Public Key from JKS File and Publish it
Once you have created JKS file with a Public-Private key pair in it, your second step is to extract the Public key from the JKS file and then publish it to the world.
To export public key from JKS file, run the following command:
keytool -export -alias ajmal_certificate -storepass tibco@ajmal -file ajmal_server.cer -keystore keystore.jks
Now we have our Public key in certificate file (ajmal_server.cer). We can give this certificate file to any client who wants to communicate with our server where we will have the key installed.
Step 3: Install SSL Certificate Key on Server Side
Using TIBCO Designer create a new project (I named it SSLServer). In the project, create a new Identity (available in General Palette).
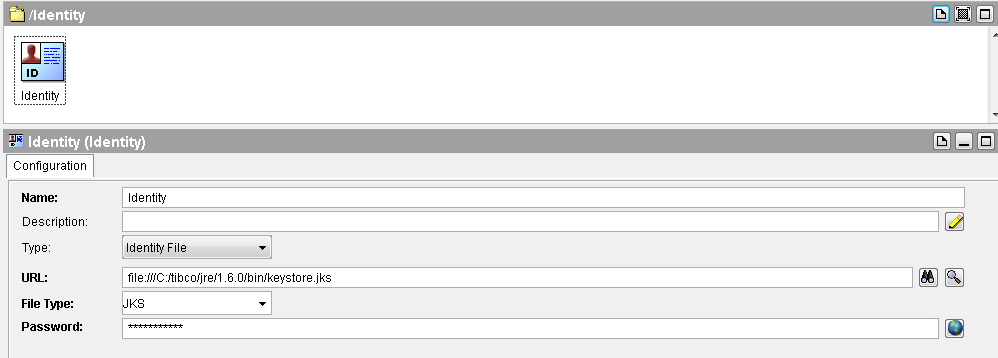
For Identity configuration, choose Identity File in the type and browse for the JKS file in the URL. Make sure that you add 3 slashes in the file name otherwise you will get an error.
In the File Type choose JKS and give the password. Password should be same that you used while creating the JKS file.
Complete configuration of Identity at the server side will look like below:
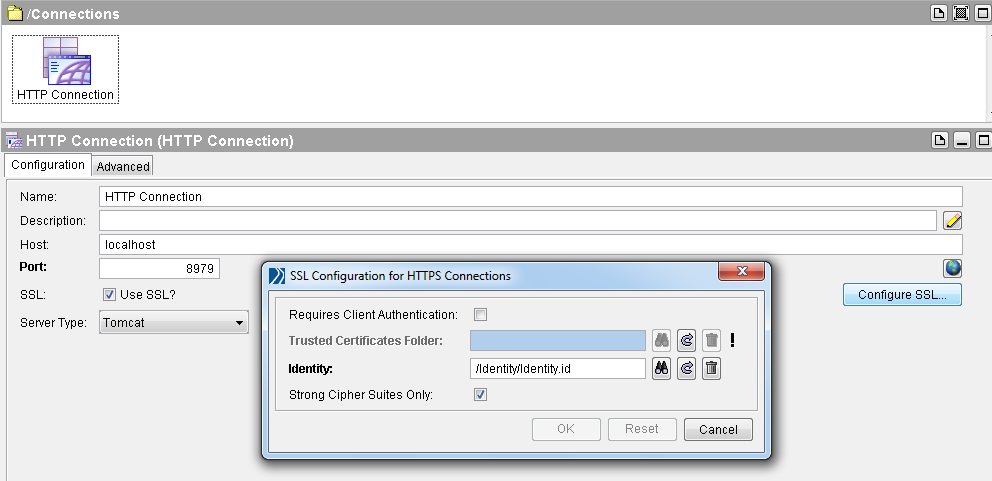
Now let us create HTTP connection and configure SSL for it. In HTTP Connection configuration, check Use SSL option. Then click on Configure SSL button and choose the identity.
HTTP Connection configuration will look like below:
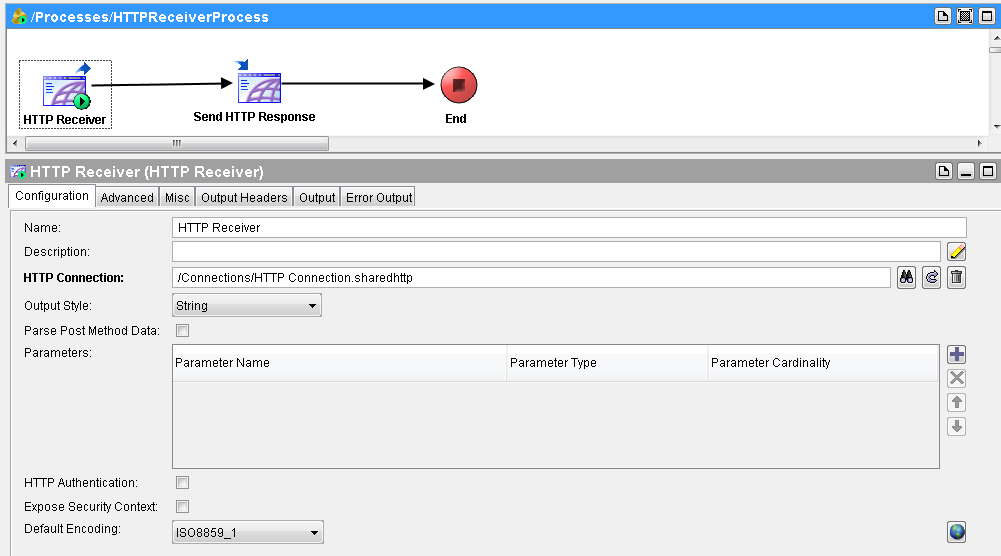
Now our SSL configured HTTP Connection is ready at server side. Create a new process and use same HTTP Connection in the HTTP receiver. The process will look like below:
Step 4: Import and Install Certificate on Client Side
Get the certificate file from the server authority (in this case ajmal_server.cer) and paste it in some folder in your client machine.
Now run the following import command to import the certificate:
keytool -import -v -trustcacerts -alias ajmal_certificate -file ajmal_server.cer -keystore my-cert.jks -keypass tibco@ajmal -storepass tibco@ajmal
Now the certificate has been successfully stored in the file my-cert.jks in the client side.
We can now move forward to create a client project in TIBCO Designer to use the certificate.
Create a new project using TIBCO Designer. I named the project as SSLClient. In the project, create a new folder with the name Security.
In the Security folder, add a new Identity from Genral Palette. For Identity, choose the JKS file and specify other parameters in the same way as we did for Identity activity at the server side.
Configuration of Identity at the client project will look like below:
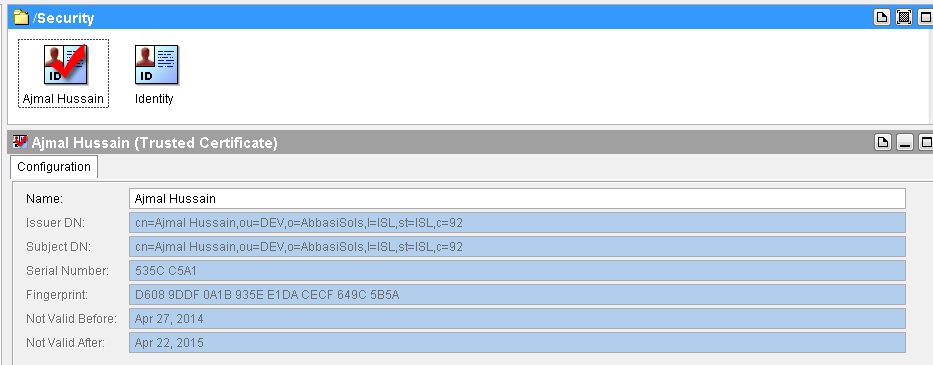
Now we need to import the certificate in our project in PEM format. For this; go to Tools–>Trusted Certificates–>Import Into PEM format. Then it will ask you to choose the certificate. Choose ajmal_server.cer for this.
Your imported certificate will now appear in the project as shown below:
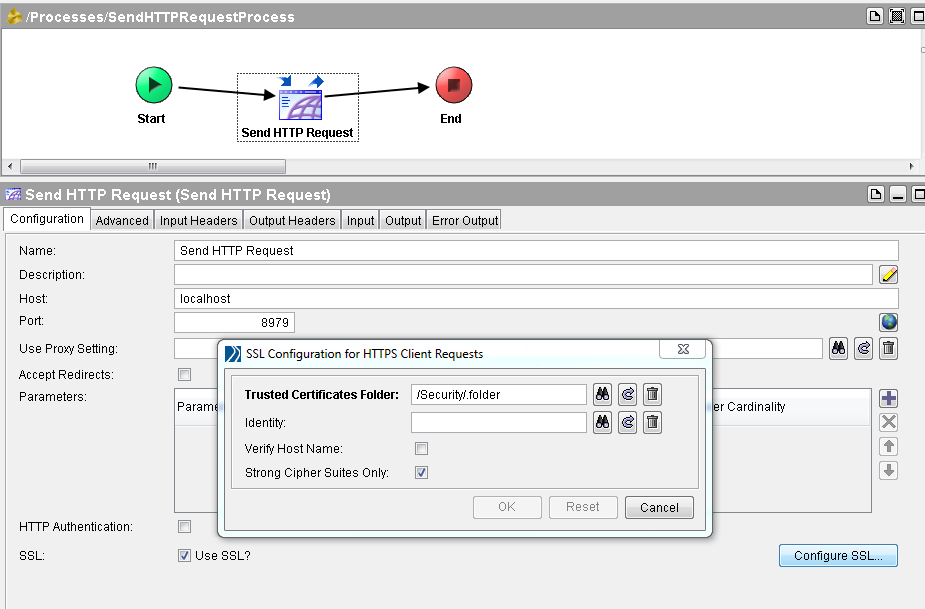
Now we can move towards creation of a new process in the client side to send a request to the server with SSL encryption enabled.
The process will be as follows:
Step 5: Test Client and Server Processes with SSL
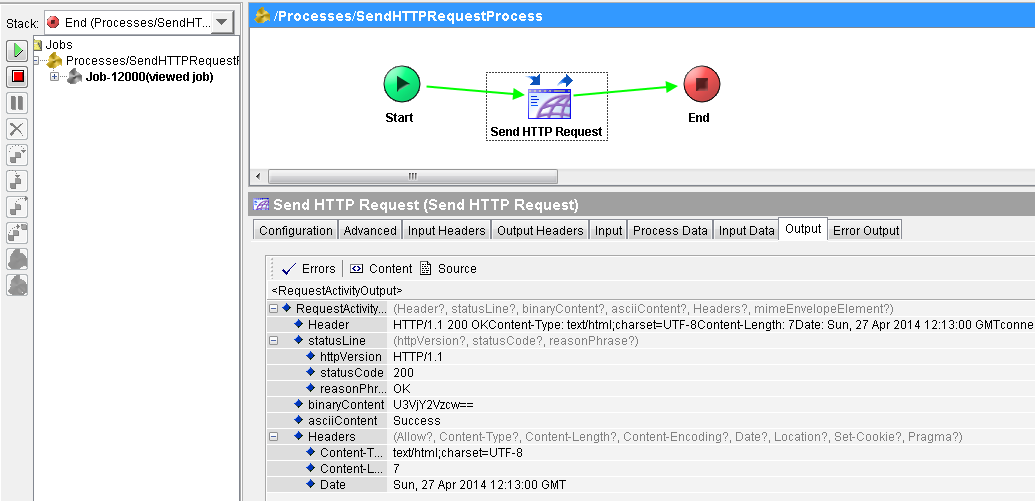
Our final step in this tutorial is to test that our SSL based client and server processes are able to communicate. Load both the processes in designer tester (in separate projects).
As you can see below request has been sent successfully from the client and response has been received:




very nice topic with complete details.
hi ajmal,
very nice information.
i tried ur Self Signed SSL Certificates step…at step5 m getting Error
kindly find the error down, where i might be am wrong.
BW-HTTP-100300 Job-734000 Error in [SSLClient./ClientProcess.process/Send HTTP Request]
An IOException was thrown while trying to execute the Http method
caused by: java.io.IOException: Failed to create secure client socket: Connection refused: connect
thankQ working 5n………
Hi Can you please suggest how the below issue is resolved?
BW-HTTP-100300 Job-51000 Error in [SSLNewServer/HTTPRequest.process/Send HTTP Request]
An IOException was thrown while trying to execute the Http method
caused by: java.io.IOException: Failed to create secure client socket: java.net.ConnectException: Connection refused: connect
Hi, i get an error with the ‘SendHTTPRequest’ process
Error:
[Processes/SendHTTPRequest.process/Send HTTP Request]
An IOException was thrown while trying to execute the Http method
caused by: java.io.IOException: Failed to create secure client socket: Connection refused: connect
clear steps to understand. Thanks Ajmal
Hi,
I tried it and while executing it gives me an error.
BW-HTTP-100300 Job-2000 Error in [BusinessProcesses/Client.process/Send HTTP Request]
An IOException was thrown while trying to execute the Http method
caused by: java.io.IOException: Failed to create secure client socket: Connection refused: connect
Hi Ajmal ,
Informations are very explicit ….thank you !!!!!
keep posting ……
I am getting the same error..
BW-HTTP-100300 Job-2000 Error in [BusinessProcesses/Client.process/Send HTTP Request]
An IOException was thrown while trying to execute the Http method
caused by: java.io.IOException: Failed to create secure client socket: Connection refused: connect
Hi Ajmal,
First of all, thank you very much for this article. It really helped me learn the basic SSL functionality.
But I got an error while running the project.It says-
“BW-HTTP-100108 process initialization failed for SSL_2/client/ssl_client.process
caused by: Initialization error in [SSL_2/client/ssl_client.process/Send HTTP Request]
caused by: A security exception was thrown while trying to load the identity.
caused by: com.tibco.security.AXSecurityException: No keys found in keystore”
Can you please throw some light on it?
Looking forward to your reply….
while selecting the SSL configuration for HTTP client , select only the trusted folder. Don’t select the identity the issue will be solved
Hi Bro, Great job.
While running — it gives the following Error on SendHTTPRequest
caused by: java.io.IOException: Failed to create secure client socket: Server certificate rejected by ChainVerifier.
Hi ,
Check the username , password and trustedstore location and alias info
I am also getting same error connection refused.
Hi I am also getting the same error. I have a Verisign Certificate with Root, intermediate. Did anybody above find any solutions????
An IOException was thrown while trying to execute the Http method
at com.tibco.plugin.share.http.client.JakartaHttpTransportDriver$RequestExecutor.run(Unknown Source)
at com.tibco.pe.util.ThreadPool$ThreadPoolThread.run(Unknown Source)
caused by: java.io.IOException: Failed to create secure client socket: Server certificate rejected by ChainVerifier
Very nice artical, nicely explained .. I appreciate your efforts.
java.io.IOException: Keystore was tampered with, or password was incorrect
Please help
mr. Ajmal Hussain Abbasi, i have problem using send http request palette with spesification below:
method:POST
uri-API: https://evaplatform.net:12801/dev/init
credential server auth: username+pass
parameter: referenceNumb
where i sould put that items in “send http request pallete” configuration?
thx a lot for your kind help
additional info: server need x-www-form-urlencoded in post data 🙂
It seems everyone needs to figure out their own errors..But a really helpful article
Ajmal, am also getting ‘Connection Refused’. help me to corrrect.
Pingback: 15 Most Popular TIBCO Tutorials on TutorialsPedia | TutorialsPedia
No keys found in keystore
–getting this exception
I am having estelvms.keystore file, now i have to call client service thats “https:….” service.
Please let me know what all steps i need to follow to creating certificate and how to use it.
Its urgent, please respond ASAP.
Thanks in Advance.
Is anyone still facing socket connection refused issue?
Iam getting below error.Iam using the port as 1234
W-HTTP-100116 Activation error with process starter [BusinessProcess/Process Definition.process]
caused by: A lifecycle exception was thrown while trying to initialize the Tomcat server
caused by: LifecycleException: Protocol handler initialization failed: java.io.IOException: An AXSecurityException was thrown while trying to create the server socket on the port [ 1234] with the message:
Keystore was tampered with, or password was incorrect
client side iam getting error as
BW-HTTP-100300 Job-5000 Error in [BS/Process Definition.process/Send HTTP Request]
An IOException was thrown while trying to execute the Http method
caused by: java.net.ConnectException: Connection refused: connect
jre version is 1.5.0.
Is any thing wrong ?
Thank you Ajmal, for the knowledge sharing effort. Your posts are very informative and helpful!! Way to go 🙂
I believe Identity activity is not required in the client side as we are not using it anywhere.
Also I tried executing it after deleting the Identity activity and it is working fine.
Although thanks for this well explained topic.
Thanks for mentioning it here, I was also thinking same that Identity is not required at client side.
Hi All,
I am also getting same error.
BW-HTTP-100300 Job-1000 Error in [MainProcess/SSLClient.process/Send HTTP Request]
An IOException was thrown while trying to execute the Http method
caused by: java.io.IOException: Failed to create secure client socket: java.net.ConnectException: Connection refused: connect
Thanks in advance
[RESOLVED]
I have change my jre ubication get out of C:\ y put my jre in desktop and it works! Sorry for my english and Thank you Ajmal! ^^
Hi Ajmal,
I am also getting same error.
BW-HTTP-100300 Job-1000 Error in [MainProcess/SSLClient.process/Send HTTP Request]
An IOException was thrown while trying to execute the Http method
caused by: java.io.IOException: Failed to create secure client socket: java.net.ConnectException: Connection refused: connect
Thanks a lot Ajmal.
Hi Ajamal,
In the above scenario you have created a identity on client side also but you havent used the identity .
you just have used the SSL certificate path .
So can you please guide in what scenario we need identity and in which scenario we need SSL Certificate path.
And in the server side you have used only identity.
Thanks,
Saurabh
Hi, Is it possible to explain how the “Connection Refused” issue is resolved?
BW-HTTP-100300 Job-51000 Error in [SSLNewServer/HTTPRequest.process/Send HTTP Request]
An IOException was thrown while trying to execute the Http method
caused by: java.io.IOException: Failed to create secure client socket: java.net.ConnectException: Connection refused: connect
Hi ,
I am using SOAP RequestFReply in client side andwhen I am trying to run in test mode I am getting this error. Could you please let me know
BW-COMMON-100037 process initialization failed for SOAPEventSource/Process Definition.process
caused by: Initialization error in [SOAPEventSource/Process Definition.process/SOAPRequestReply]
caused by: SoapServiceConfigurationError
caused by: The server certificate [ The server certificate [ /Connection/.folder ] not found ] not found
use dafault SSL port 443 in HTTP connection, this will solve Connection refused issue
Hello Ajmal,
My only query is that why we have not used identity at client side in addition to the trusted Certificates Folder option and in which scenarios we will use both : identity and trusted certificates folder at client side and similarly on server side.
Please help.
2 way SSL handshake.