While working with EMS based messaging in TIBCO, you may come across scenarios where you want to select some specific kind of messages only from a queue or a topic and process that instead of getting all the messages from that destination. JMS provides Message Selector feature which comes into play in this type of scenarios. In this TIBCO JMS Message Selector step by step tutorial, you will learn how to use message selector in TIBCO EMS based processes to filter the messages based on some header properties.
What are EMS Message Selectors?
Message Selector is an API provided by JMS Specifications which is used for filtering of messages from a queue or topic. JMS Message Selector allows a message consumer to specify the messages it is interested in.
Filtering of EMS Messages is done based on an expression which is written in SQL92 syntax. Only those messages which fulfill the condition given in the message selector are consumed by the consumer process while remaining messages remain intact in the queue/topic in the Pending state.
Now let’s proceed with the step by step tibco tutorial which uses message selector to filter EMS Messages.
Business Scenario:
For this tutorial, I am taking a simple example scenario in which we want to consume only those messages from EMS Queue which have status property “Pass”.
Step 1: Create JMS Connection to the Server
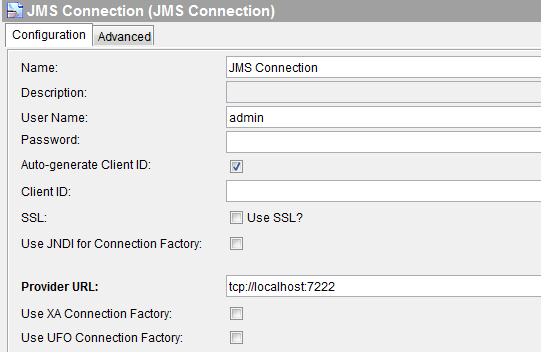
The first thing that we need to do is to drag JMS Connection resource from JMS Palette in our TIBCO Designer Project. Configure JMS Connection based on the required values for your EMS Server. Once configured, use Test Connection button to make sure that everything is fine in terms of connectivity with EMS Server.
Configurations of JMS Connection in my case are shown in below screenshot:
Step 2: Create JMS Application Properties
In this step we will add a shared resource JMS Application Properties from JMS palette in which we will define a property named ”status”. This property will be later used for message selector.
JMS Application Properties configured are shown below:
Step 3: Create a Process to Send JMS Messages to a Queue
In this step, we will create a process which will send message to a queue using JMS Queue Sender activity.
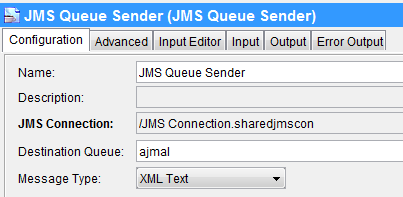
In the configuration tab of JMS Queue Sender activity, specify the Connection as well as the destination queue in the similar way as shown in below screenshot:
In the Advanced tab, choose JMS Application Properties shared resource which was created in the previous step.
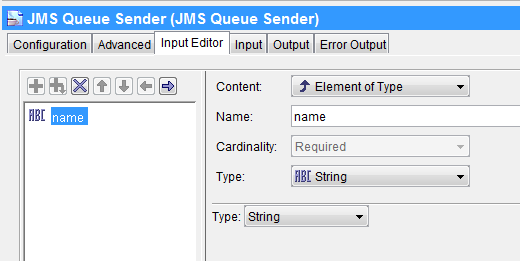
In the Input Editor tab, just create a String Element named as “name” in which we will be sending the name of a person. This is shown in below screenshot:
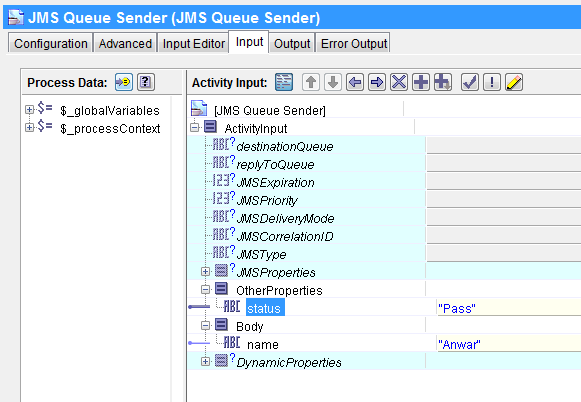
Now go to Input tab and here we need to give some value to status property field as well as name field. Let’s give “Pass” value to status field so that based on our message selector condition, message gets consumed.
Now let’s proceed to the next step in which we will create process to consume EMS message.
Step 4: Create Process to Consume JMS Queue Message with Message Selector
Create a new process and add JMS Queue Receiver from JMS palette as process starter activity. In the configuration tab of this activity, choose JMS Connection and destination queue.
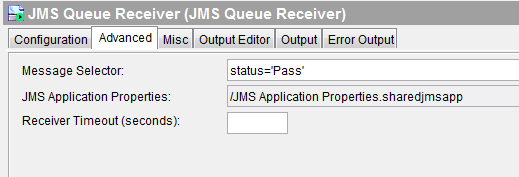
In the Advanced tab, go to Message Selector field. This is the field where we will add expression which will act as a filtering condition for the messages.
As you can see in below screenshot, I have used condition to select only those messages from the queue for which status value is “Pass”.
In the output editor tab, add name element in the same way as you did for JMS Queue Sender process in previous step.
We are not going to add any further logic in the process to keep it simple.
Step 5: Test JMS Message Selector Based Processes in TIBCO Designer
Validate the project to make sure that everything has been designed and configured correctly. Once validated, load both processes (sender and receiver processes) in designer tester and create a job for Sender process.
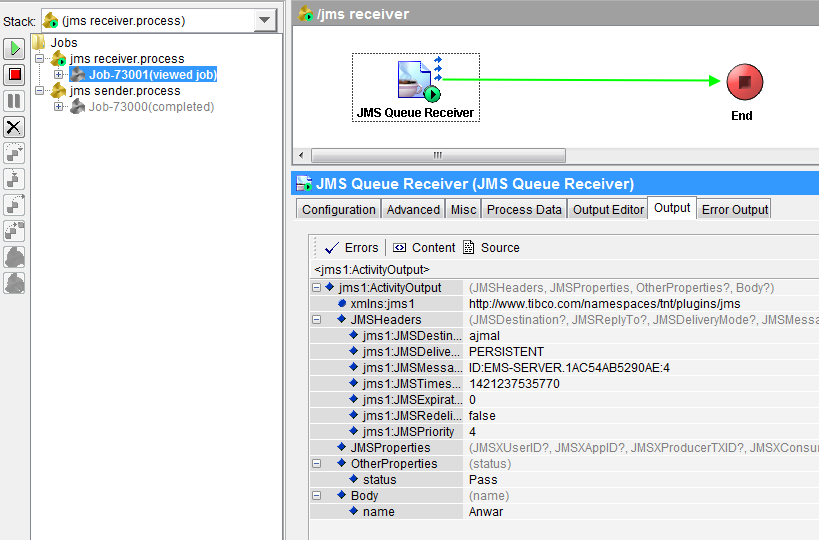
As you can see below, message has been sent to queue by sender process and has been successfully consumed by receiver process as selector condition (status=”Pass”) was met:
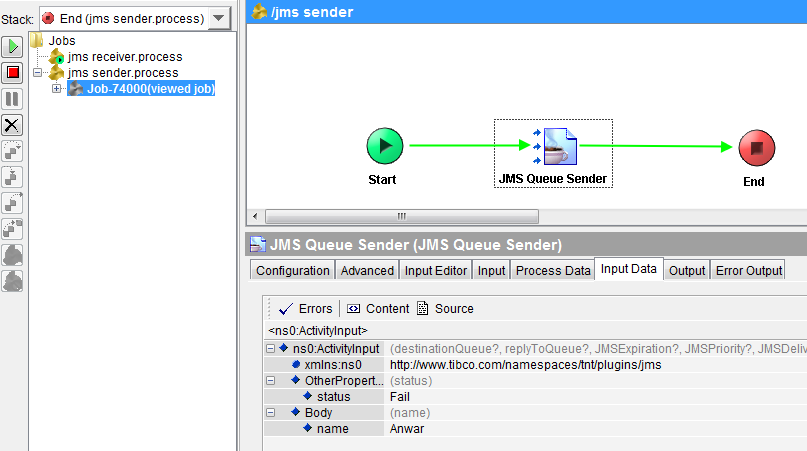
Now if we try to test these processes by giving a different status property value (e.g. Fail), we will see that message doesn’t get consumed by the consumer as Message Selector condition is not fulfilled:
This completes our step by step tutorial on TIBCO EMS Message Selector. Feel free to contact me for any further queries or help. Thanks


Hi Ajmal,
Your post are decent and useful with code and print screens, which almost none of the TIBCO blogs are providing.
Here in this example you might wrongly posted a wrong print screen in step 4(Instead of JMS Receiver selector, JMS Connection print screen ). Can you correct the same please?
Dear Raj,
Thanks for letting me know the mistake. Now I have added correct screenshot.
Hi Ajmal, Nice Post!!
I need one help. I am trying to select messages for particular JMSXGroupID. So if one instance of process picks one message, later it should pick messages for JMSXGroupID which is specify in the first message. So I am looking for dynamic message selector. Could you tell me how can i do this?
Regards,
Sham
I have similar requrement as Sham mentioned above.
Basically, what i have seen is that when i have multithreaded consumer JMXSGroupId works in ActiveMQ and delivers it in specific threads.
But it doesnt work in TIBCO. Any way to acheive same goal.
thanks
can u please give more examples for pratice
Can we compare the JMSCorrelationID in the Selector of the Get JMS Queue Message Activity with Message ID of the JMS Sender Activity?
Here is the scenario. I have sent a message using the JMS Queue Sender Activity. And Now i want to receive the message using the Get JMS activity. How do I write the Selector in the Get JMS Message queue.
Thanks in advance.
Selector value should be mentioned as below.
concat(“JMSCorrelationID=”,”‘”,FilterValue,”‘”)
for example, if you have application name specified in the JMSCorrelationID within JMSSendMessageActivity, the selector xpath expression would be as follows.
concat(“JMSCorrelationID=”,”‘”,appname,”‘”)
hai, ajmal am new to this tibco messaging.
i want some examples regarding how to create a process which send 5 messages over a queue.so can you please help on this.
Hi Ajmal,
can you please explain detail of difference between Broker stat and destination stat,
Regards,
Praveenkumar
Hi Guruji,
I got an error while connect to ems administration tool in linux(terminal) and EMS server started successfully.
after click on Enter
i.e.,
Ems server
2017-11-19 15:29:33.814 Process started from ‘./tibemsd’.
2017-11-19 15:29:33.815 Process Id: 2927
2017-11-19 15:29:33.815 Hostname: ubuntu
2017-11-19 15:29:33.815 Hostname IP address: 127.0.1.1
2017-11-19 15:29:33.815 Reading configuration from ‘tibemsd.conf’.
2017-11-19 15:29:33.840 Server name: ‘E4EMS-SERVER’.
2017-11-19 15:29:33.840 Storage Location: ‘.’.
2017-11-19 15:29:33.840 Routing is disabled.
2017-11-19 15:29:33.840 Authorization is disabled.
2017-11-19 15:29:33.910 Accepting connections on tcp://ubuntu/[::]:7222.
2017-11-19 15:29:33.910 Accepting connections on tcp://ubuntu/0.0.0.0:7222.
2017-11-19 15:29:33.910 Recovering state, please wait.
2017-11-19 15:29:33.943 Server is active.
IN EMS administration tool
tibco@ubuntu:~/ems/8.3/bin$
TIBCO Enterprise Message Service Administration Tool.
Copyright 2003-2016 by TIBCO Software Inc.
All rights reserved.
Version 8.3.0 V14 3/9/2016
Type ‘help’ for commands help, ‘exit’ to exit:
>connect — simple relaying command via proxy.
Version 1.101
usage: connect [-dnhst45] [-p local-port][-R resolve] [-w timeout]
[-H proxy-server[:port]] [-S [user@]socks-server[:port]]
[-T proxy-server[:port]]
[-c telnet-proxy-command]
host port
[1]+ Stopped ./tibemsadmin
tibco@ubuntu:~/ems/8.3/bin$
please give me resolution for this as early as possible
I tried another command
i.e.,
I got an error while connect to ems administration tool in linux(terminal) and EMS server started successfully.
after click on Enter
i.e.,
Ems server
2017-11-19 15:29:33.814 Process started from ‘./tibemsd’.
2017-11-19 15:29:33.815 Process Id: 2927
2017-11-19 15:29:33.815 Hostname: ubuntu
2017-11-19 15:29:33.815 Hostname IP address: 127.0.1.1
2017-11-19 15:29:33.815 Reading configuration from ‘tibemsd.conf’.
2017-11-19 15:29:33.840 Server name: ‘E4EMS-SERVER’.
2017-11-19 15:29:33.840 Storage Location: ‘.’.
2017-11-19 15:29:33.840 Routing is disabled.
2017-11-19 15:29:33.840 Authorization is disabled.
2017-11-19 15:29:33.910 Accepting connections on tcp://ubuntu/[::]:7222.
2017-11-19 15:29:33.910 Accepting connections on tcp://ubuntu/0.0.0.0:7222.
2017-11-19 15:29:33.910 Recovering state, please wait.
2017-11-19 15:29:33.943 Server is active.
IN EMS administration tool
tibco@ubuntu:~/ems/8.3/bin$
TIBCO Enterprise Message Service Administration Tool.
Copyright 2003-2016 by TIBCO Software Inc.
All rights reserved.
Version 8.3.0 V14 3/9/2016
Type ‘help’ for commands help, ‘exit’ to exit:
I was typed
>connect tcp://ubuntu/0.0.0.0:7222
ERROR: You must specify the destination port correctly.
usage: connect [-dnhst45] [-p local-port][-R resolve] [-w timeout]
[-H proxy-server[:port]] [-S [user@]socks-server[:port]]
[-T proxy-server[:port]]
[-c telnet-proxy-command]
host port
tibco@ubuntu:~/ems/8.3/bin$ connect tcp://ubuntu/[::]:7222
ERROR: You must specify the destination port correctly.
usage: connect [-dnhst45] [-p local-port][-R resolve] [-w timeout]
[-H proxy-server[:port]] [-S [user@]socks-server[:port]]
[-T proxy-server[:port]]
[-c telnet-proxy-command]
host port
Hi Sri,
You have typed the wrong port number, the correct syntax is like >connect tcp://localhost(Ubuntu):7222.
for your case hostname is Ubuntu, so use it and try it again, hopes so it will.
correct Syntax: > connect tcp://localhost:7222
while first time connecting to the Tibco EMS Administrator the user id and password will be blank, just click Enter and Enter.
you may set the password for Tibco EMS Administrator by using the below command once you connected to EMS administrator.
>set password
for me, input editor tab is disabled in jms queue sender. please help!!!
You need to select XML type as a message for jms you might have selected the text.
Hi Ajmal, Thank you very much for your very informative TIBCO VIDEOS. is there a TIBCO Designer free download for practising ? I would like do some practicals on my laptop ?
Hi Ravi,
You will get the Tibco designer by installing the tibco products on your Laptop/desktop, there is sequence of Tibco product installation and that need to follow it, like first JDK above 1.8 then RV 8.4 then TRA 5.8 and then BW 5.11 or above, Tibco designer will be installed as part of tibco TRA 5.8 and all palettes will be visible to you once you installed the Tibco BW.
Hi Ajmal,
I have specified dynamic properties in the JMS Send Message activity. In the GetJMSQueueMessage, I need filter messages based on the value present in dynamic properties. How we can do that?
Hi Ajmal,
Please help me out with Selector where I have to achieve below Scenario
Message Selector on JMS Header Property Name – “Correlation ID”. Condition where last 2 digits of ID is between 0 – 50.
HI Ajmal,
can you help me this example in tibcobw6.
Thanks
Kiran