In this Java JSP Hibernate Tutorial, I am going to explain in details how to create a MVC (Model View Controller) based web application in JAVA using JSP as front end technology, Hibernate technology for persistence at Model Layer to store data to and fetch data from Oracle database, Servlets as Controllers and JAVA classes based business services for business logic implementation.
Application Scenario:
To explain how to develop MVC based web application in JAVA, I am taking a very simple scenario here for Account Management System with below use cases:
1. User Can Add New Account by adding account related information through a Web Form
2. User can Search for any account information through a search form.
Technologies Used:
- Oracle as back-end database.
- JSP as front end view technology to create User Interface.
- Hibernate as ORM (Object Relational Mapping) technology.
- JAVA Servlets as Controllers.
- JAVA Classes for business Services implementation
- Netbeans as IDE.
- Glass Fish as application server.
Steps to create JSP, Hibernate Web Application
Step 1: Create JAVA Web Application Project
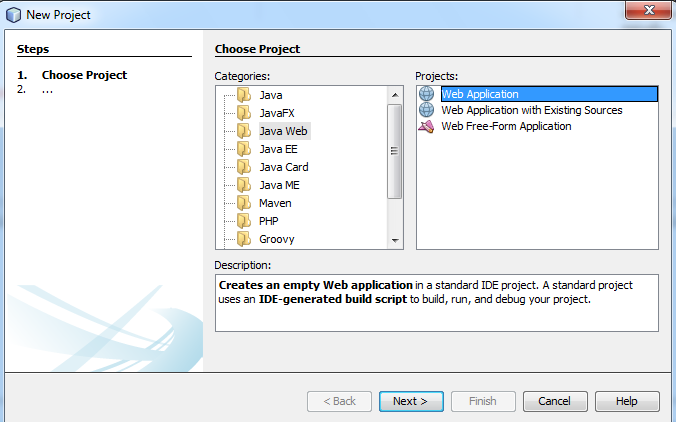
In Netbeans IDE, go to File Menu and choose New Project option. In the Categories, choose Java Web and Web Application in the projects options.
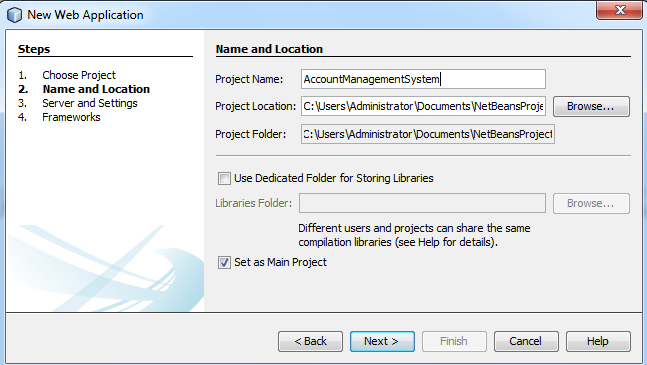
Click on the Next button and specify Project Name and Location as shown in the screenshot below:
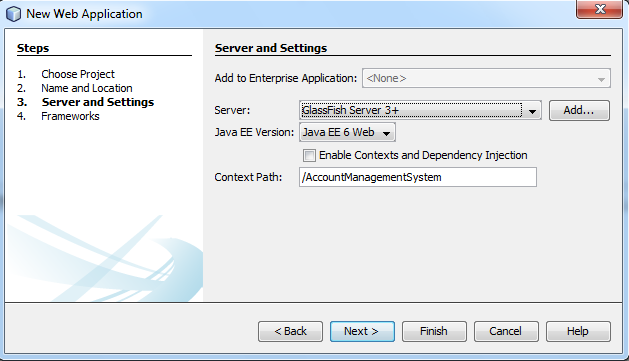
Click Next button and now select the server. I have Glass Fish Server already installed so I am using that. You can add a new server if you want by clicking on Add button.
Also select Java EE Version for your application.
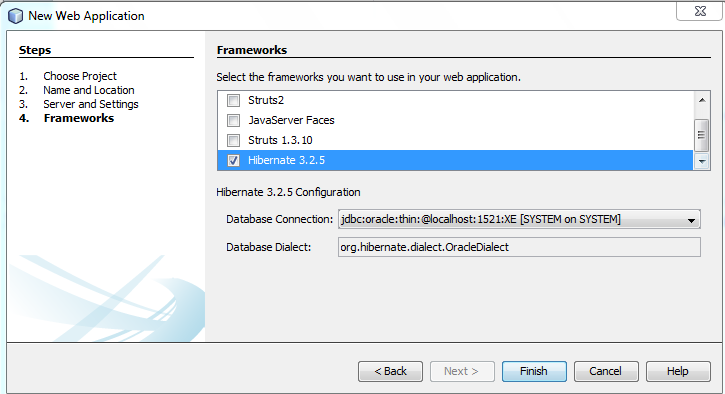
Click on Next button and now choose Hibernate from the list of frameworks. Once you check Hibernate in the framework list, Hibernate Configuration options appear. If you have already created a database connection, simply choose that. Otherwise, use New Database Connection option to create a new connection.
In my case, I have already created database connection to Oracle and I am simply choosing the connection from the drop down list as shown in screenshot below:
Now just click on the Finish button. This completes our first step of creating Java Web Application project in Netbeans IDE.
You will notice that Hibernate Configuration file (hibernate.cfg.xml) will be created in your project Source Packages with configuration details like below:
<!--?xml version="1.0" encoding="UTF-8"?-->


    org.hibernate.dialect.OracleDialect
    oracle.jdbc.OracleDriver
    jdbc:oracle:thin:@localhost:1521:XE
    SYSTEM
admin |
Step 2: Prepare database for Application
For simple Account Management Scenario, we are going to have only one database table TBL_ACCOUNT which will store account related information. Use below sql query to create the table in database:
create table TBL_ACCOUNT
(
ACCOUNT_ID NUMBER,
ACCOUNT_BALANCE NUMBER,
ACCOUNT_BENEFICIARY VARCHAR2(30),
ACCOUNT_TYPE VARCHAR2(10)
)
Step 3: Create Hibernate Utility Class, Hibernate Configurations, POJOs and Mapping Files
In this step, we will work on Model Layer of our application in which we will create Hibernate Reverse Engineering (reveng) file and then using this file, we will create POJO and Hibernate Mapping XML file based on our database table TBL_ACCOUNT
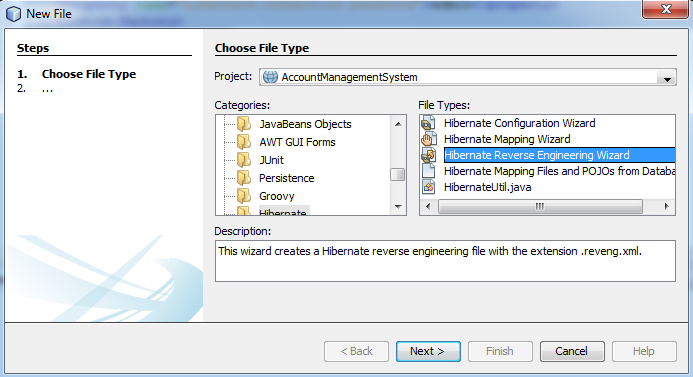
Create a new Package inside Source Packages of your project and name it as Model. Now Right Click on this Package Name and then by going to New–>Other, select Hibernate from the Category and then Hibernate Reverse Engineering Wizard from the File Type options as shown in below screenshot:
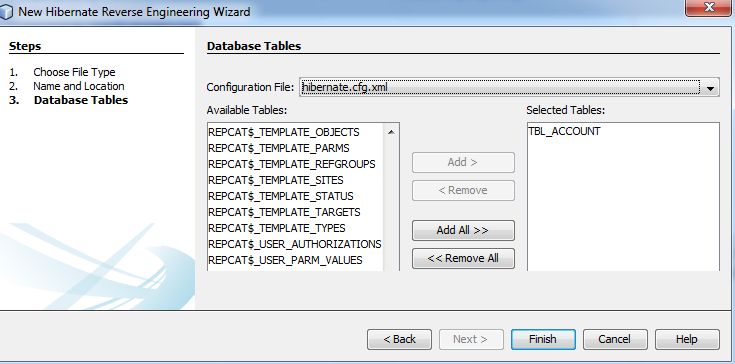
In the next screen you will be asked to give a name to this file. After that click Next button again. Now application will connect to the database and will retrieve list of all available tables from the chosen schema. Choose the table TBL_ACCOUNT and then use Add button to move it to Selected Tables List. (Please note that Table Must have a Primary Key otherwise It won’t be available to be added).
A new file with the name Hibernate.reveng.xml will be created in the Model package with below configurations:
<!--?xml version="1.0" encoding="UTF-8"?--> |
Now we need to create POJO and mapping file (hbm.xml) based on the database table TBL_ACCOUNT
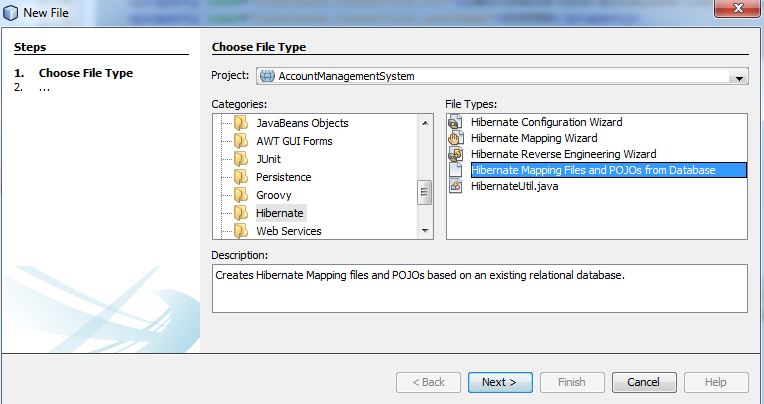
For this purpose, right click on Model Package and choose Other–>Hibernate–>Hibernate Mapping Files and POJOs from Database option as shown below:
Click Next and then choose Hibernate Configuration File, Reverse Engineering File and then click Finsih.
A new hibernate mapping file (TblAccount.hbm.xml) is created as shown below:
<!--?xml version="1.0"?--> <!-- Generated Nov 17, 2014 9:32:00 PM by Hibernate Tools 3.2.1.GA --> |
Similarly, POJO class with the name TblAccount.java has also been created based on the columns of database table. POJO class contains all the properties along with their Getter and Setter methods as shown below:
package Model; // Generated Nov 17, 2014 9:31:58 PM by Hibernate Tools 3.2.1.GA import java.math.*; /** * TblAccount generated by hbm2java */ public class TblAccount implements java.io.Serializable { private int accountId; private int accountBalance; private String accountBeneficiary; private String accountType; public TblAccount() { } public TblAccount(int accountId) { this.accountId = accountId; } public TblAccount(int accountId, int accountBalance, String accountBeneficiary, String accountType) { this.accountId = accountId; this.accountBalance = accountBalance; this.accountBeneficiary = accountBeneficiary; this.accountType = accountType; } public int getAccountId() { return this.accountId; } public void setAccountId(int accountId) { this.accountId = accountId; } public int getAccountBalance() { return this.accountBalance; } public void setAccountBalance(int accountBalance) { this.accountBalance = accountBalance; } public String getAccountBeneficiary() { return this.accountBeneficiary; } public void setAccountBeneficiary(String accountBeneficiary) { this.accountBeneficiary = accountBeneficiary; } public String getAccountType() { return this.accountType; } public void setAccountType(String accountType) { this.accountType = accountType; } } |
Now we need to create a Utility class for hibernate session handling. For this purpose, create a new package and name it as Util. Now right click on this package and then choose Other–>Hibernate–>HibernateUtil.java to crate a new utility file.
A new class with the name NewHibernateUtil.java is created with session related code as shown below:
/* * To change this template, choose Tools | Templates * and open the template in the editor. */ package Util; import org.hibernate.cfg.AnnotationConfiguration; import org.hibernate.SessionFactory; /** * Hibernate Utility class with a convenient method to get Session Factory * object. * * @author Administrator */ public class NewHibernateUtil { private static final SessionFactory sessionFactory; static { try { // Create the SessionFactory from standard (hibernate.cfg.xml) // config file. sessionFactory = new AnnotationConfiguration().configure().buildSessionFactory(); } catch (Throwable ex) { // Log the exception. System.err.println("Initial SessionFactory creation failed." + ex); throw new ExceptionInInitializerError(ex); } } public static SessionFactory getSessionFactory() { return sessionFactory; } } |
Step 4: Implement Business Logic in Business Services
In this step, we will create a class with the name AccountService.java and will implement business logic for account query and account addition in it.
Crate a new package and name it as BusinessServices. Create a new Java Class AccountService.java in the package.
In this class implement following two methods:
1. addAccount method to persist (save) account object in database table using hibernate.
2. searchAccount method to fetch account information from database table using hibernate.
Code of this service is shown below:
/* * To change this template, choose Tools | Templates * and open the template in the editor. */ package BusinessServices; import org.hibernate.Transaction; import org.hibernate.Session; import Model.TblAccount; import Util.NewHibernateUtil; import com.sun.tools.xjc.reader.xmlschema.bindinfo.BIConversion.User; import org.hibernate.Query; /** * * @author Administrator */ public class AccountService { public String addAccount(TblAccount acc) { String message=null; Session s=null; try { s=NewHibernateUtil.getSessionFactory().openSession(); Transaction tr=s.getTransaction(); tr.begin(); s.save(acc); tr.commit(); message="Saved Data"; return message; } catch (Exception e) { return (e.getMessage()); } finally { s.close(); } } public TblAccount searchAccount(String pi_Id) { String message=null; Session session=null; Transaction tx = null; TblAccount account = null; try { session=NewHibernateUtil.getSessionFactory().openSession(); tx = session.getTransaction(); tx.begin(); Query query = session.createQuery("from TblAccount where accountId='"+pi_Id+"'"); account = (TblAccount)query.uniqueResult(); tx.commit(); } catch (Exception e) { if (tx != null) { tx.rollback(); } e.printStackTrace(); } finally { session.close(); } return account; } } |
Step 5: Add Controller Logic by Adding Servlet Controllers
We are now done with our Model and Business Service development. Let’s now create Controller Servlets which will receive the requests from the View (JSP pages) and then route the requests to the Business Service.
Create a new package and name it as Controller. In this package, add a new Java Servlet using New–>Servlet option.
Name the servlet as AddAccountController. This controller will receive the request for Account Addition and then It will route the request to AccountService by calling its addAccount method.
Code of the controller is shown below:
/* * To change this template, choose Tools | Templates * and open the template in the editor. */ package Controller; import BusinessServices.AccountService; import Model.TblAccount; import java.io.IOException; import java.io.PrintWriter; import javax.servlet.RequestDispatcher; import javax.servlet.ServletException; import javax.servlet.annotation.WebServlet; import javax.servlet.http.HttpServlet; import javax.servlet.http.HttpServletRequest; import javax.servlet.http.HttpServletResponse; /** * * @author Administrator */ @WebServlet(name = "AddAccountController", urlPatterns = {"/AddAccountController"}) public class AddAccountController extends HttpServlet { protected void processRequest(HttpServletRequest request, HttpServletResponse response) throws ServletException, IOException { response.setContentType("text/html;charset=UTF-8"); PrintWriter out = response.getWriter(); try { String pi_AccountTitle=request.getParameter("AccountTitle"); String pi_AccountType=request.getParameter("AccountType"); int pi_AccountBalance=Integer.parseInt(request.getParameter("AccountBalance")); int pi_accountID=Integer.parseInt(request.getParameter("AccountID")); TblAccount ac=new TblAccount(pi_accountID, pi_AccountBalance, pi_AccountTitle, pi_AccountType); AccountService acs=new AccountService(); String resultMessage=acs.addAccount(ac); RequestDispatcher rd =request.getRequestDispatcher("index.jsp?message="+resultMessage); request.setAttribute("searchResult", null); rd.forward(request, response); } finally { out.close(); } } // /** * Handles the HTTP * <code>GET</code> method. * * @param request servlet request * @param response servlet response * @throws ServletException if a servlet-specific error occurs * @throws IOException if an I/O error occurs */ @Override protected void doGet(HttpServletRequest request, HttpServletResponse response) throws ServletException, IOException { processRequest(request, response); } /** * Handles the HTTP * <code>POST</code> method. * * @param request servlet request * @param response servlet response * @throws ServletException if a servlet-specific error occurs * @throws IOException if an I/O error occurs */ @Override protected void doPost(HttpServletRequest request, HttpServletResponse response) throws ServletException, IOException { processRequest(request, response); } /** * Returns a short description of the servlet. * * @return a String containing servlet description */ @Override public String getServletInfo() { return "Short description"; }// } |
Now add code logic for our searchController servlet. This servlet will receive requests for searching any account based on account ID value.
Complete servlet code of this searchController servlet is shown below:
/* * To change this template, choose Tools | Templates * and open the template in the editor. */ package Controller; import BusinessServices.AccountService; import Model.TblAccount; import java.io.IOException; import java.io.PrintWriter; import javax.servlet.RequestDispatcher; import javax.servlet.ServletException; import javax.servlet.annotation.WebServlet; import javax.servlet.http.HttpServlet; import javax.servlet.http.HttpServletRequest; import javax.servlet.http.HttpServletResponse; /** * * @author Administrator */ @WebServlet(name = "searchController", urlPatterns = {"/searchController"}) public class searchController extends HttpServlet { /** * Processes requests for both HTTP * <code>GET</code> and * <code>POST</code> methods. * * @param request servlet request * @param response servlet response * @throws ServletException if a servlet-specific error occurs * @throws IOException if an I/O error occurs */ protected void processRequest(HttpServletRequest request, HttpServletResponse response) throws ServletException, IOException { response.setContentType("text/html;charset=UTF-8"); PrintWriter out = response.getWriter(); try { String pi_AccountID=request.getParameter("searchValue"); AccountService acs=new AccountService(); TblAccount acc_obj= acs.searchAccount(pi_AccountID); RequestDispatcher rd =request.getRequestDispatcher("index.jsp"); request.setAttribute("searchResult", acc_obj); rd.forward(request, response); } finally { out.close(); } } // /** * Handles the HTTP * <code>GET</code> method. * * @param request servlet request * @param response servlet response * @throws ServletException if a servlet-specific error occurs * @throws IOException if an I/O error occurs */ @Override protected void doGet(HttpServletRequest request, HttpServletResponse response) throws ServletException, IOException { processRequest(request, response); } /** * Handles the HTTP * <code>POST</code> method. * * @param request servlet request * @param response servlet response * @throws ServletException if a servlet-specific error occurs * @throws IOException if an I/O error occurs */ @Override protected void doPost(HttpServletRequest request, HttpServletResponse response) throws ServletException, IOException { processRequest(request, response); } /** * Returns a short description of the servlet. * * @return a String containing servlet description */ @Override public String getServletInfo() { return "Short description"; }// } |
Step 6: Create View in the form of JSP Page
As we are already done with implementation of our Business Service logic, controller logic based on our Model Layer POJOs, now Its time to create the front end of our application.
For UI Layer, I am creating a simple JSP page (index.jsp) which has two forms:
- Search Form to submit a search request to the searchController servlet and to display search results in a table.
- Add Form to enable user to add a new Account by submitting request to addAccountController servlet.
Complete code of JSP page is shown below:
<%-- Document : index Created on : Nov 17, 2014, 7:47:45 PM Author : Administrator --%> <%@page contentType="text/html" pageEncoding="UTF-8"%> <%@ page import="Model.TblAccount" %> |
TutorialsPeida JSP Hibernate Example!
Account Search Form
<% TblAccount acc= (TblAccount) request.getAttribute(“searchResult”); if (acc !=null) { %>
| Account ID | <% out.println(acc.getAccountId()); %> |
| Account Title | <% out.println(acc.getAccountBeneficiary()); %> |
| Account Balance | <% out.println(acc.getAccountBalance()); %> |
| Account Type | <% out.println(acc.getAccountType()); %> |
<% } %>
Account Creation Form
<% String rMessage=request.getParameter(“message”); if (rMessage==null) rMessage=””; out.println(rMessage); %>
This completes our tutorial developing JSP Hibernate Web Application in Netbeans with Oracle database. Deploy the application in Glass Fish server and run it. You should be able to add new account as well as search for any account information.

Superb tutor, well helped!!!
This tutorial solved my Problem. Thank you sir 🙂
well Explained
i didn’t find save() method in Account Service. don’t save data in database
Thanks for writing a valuable blog which resolve my issues. And I request you to write a blog in which edit and form print or view error are resolving.
sir widout primary key rev engg wiz file not selected
i use ntbean 8.2
oracle 10g