After going through my blog posts on Developing SOAP Over HTTP Web Service in TIBCO and TIBCO SOAP Web Service over JMS, many people contacted me and asked me to write a step by step tutorial on how to develop REST web services in TIBCO.
In this TIBCO BW REST Web Service step by step tutorial, I am going to explain how to create Restful Web Service using TIBCO BW REST & JSON Plugin.
TIBCO BW Restful Web Service Implementation Scenario:
For this tutorial example, I am going to take a simple scenario to explain you the steps for creating RESTful service in TIBCO BW. This service will be used to query Account Details from a database table based on Account ID.
For simplicity, the client process will be sending just a hard coded AccountID for which, our service will fetch the account details from the database and will send back as a service response in XML format.
If you prefer to follow my video tutorial instead, on TutorialsPedia YouTube Channel, You can watch below video where I have implemented a different scenario of User Management Restful web service with POST and GET verbs.
If you prefer to continue with Account Query Scenario, continue following the below steps.
Let’s now go step by step to develop our Restful Web Service:
Step 1: Create Connection Shared Resources
Our RESTful TIBCO Web Service will use HTTP connection as a transport. So we need to create a HTTP Connection in our BW Project. Also, we need to create a JDBC Connection as we will be connecting to ORACLE database to fetch Account details from a table.
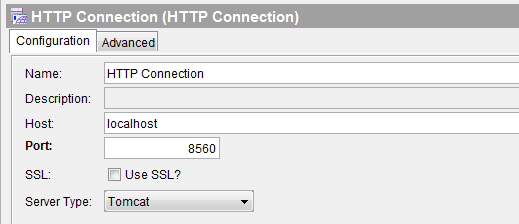
Add HTTP Connection in the project from the HTTP Palette with configurations as shown below:
Next, you can see in below screenshot the configurations in the JDBC Connection activity. JDBC Connection activity is available in the JDBC Palette. Please note that if you are using some other database system (like MS-SQL or DB2), you will have to choose the driver and configuration parameters accordingly.
For my case, configuration details for JDBC Connection are shown below:
Step 2: Create XML Schema to be used as RESTFul Service Input and Output
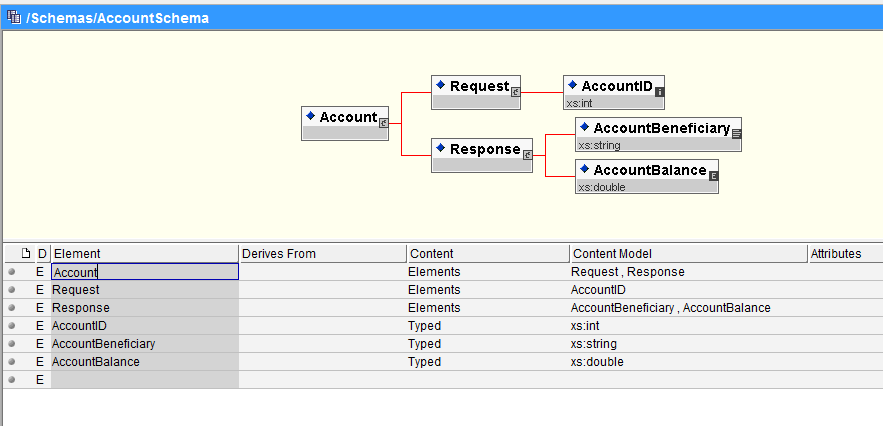
Our second step in this tutorial is to create a XML Schema (XSD file) that will be used for Request and Response in our TIBCO RESTFul Service Implementation. For our account query example scenario, Schema will contain only AccountID in the request while response will contain AccountBeneficiary and AccountBalance.
Schema will be as shown in below screenshot:
Step 3: Create Business Logic Implementation process
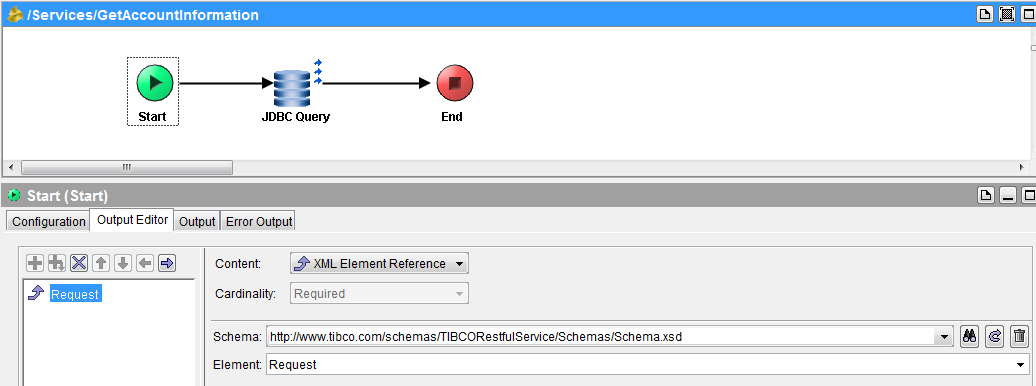
In this step, we are going to create a process which will have our service business logic implemented. Our business logic in this example case is very simple. We are just going to use the schema that we created in above step as Input and Output in our process and will use JDBC Query Activity to query account details from the database so that account details are sent as output from the process.
As you can see in below screenshot, Start activity Input Editor is referring to the Request Element of the Schema:
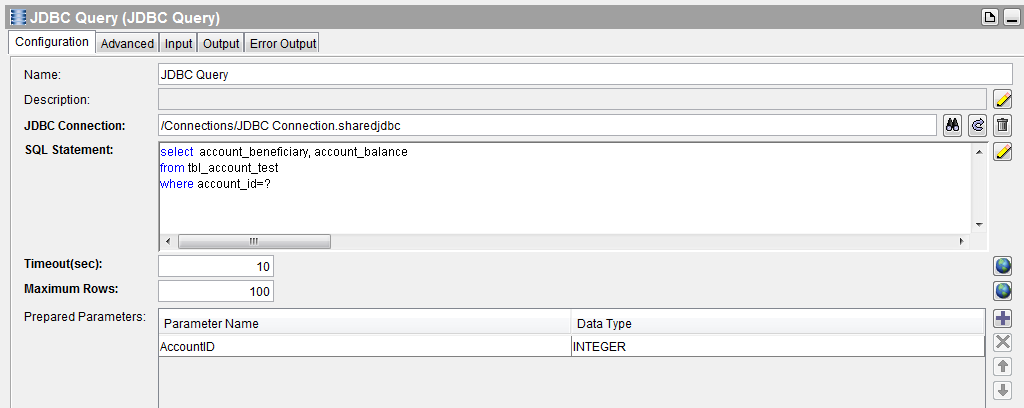
In the JDBC Query Activity configuration tab, we are going to write following query to fetch the account details from the database:
select account_beneficiary, account_balance
from tbl_account_test
where account_id=?
The ? means that we will be using a parameter. As you can see in below diagram, parameter has been added (AccountID value coming in Start activity will be mapped to this parameter in the Input tab).
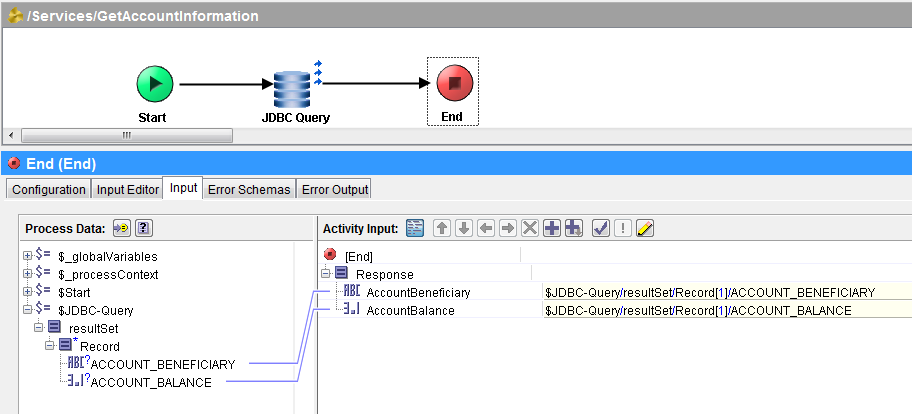
As you can see in below screenshot, the output of JDBC Query activity (first record) is being mapped to End activity Schema elements so that It is sent as an output from this process.
Step 4: Create RESTful Service Using REST Dispatch and Reply activity
In this step, we will create a service by using REST Dispatch and Reply activity from the REST & JSON Palette. Using REST Dispatch and Reply activity, we can expose a BW process as a RESTFul service. The BW process that we created in Step 3 will be used in this case as RESTful service implementation process.
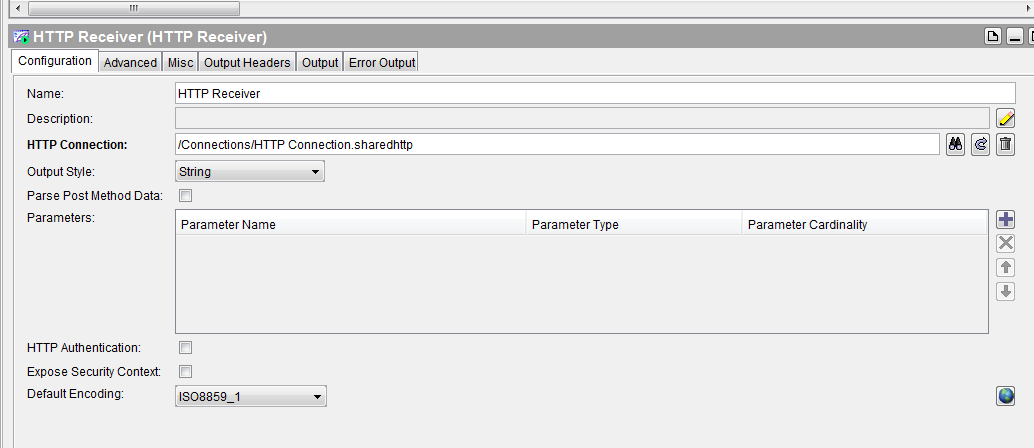
We will use HTTP Receiver as process starter for this process so that It can be started by the client process using Invoke REST API activity. The HTTP Connection that we created in Step 1 will be used in this HTTP Receiver as shown in the below screenshot:
Next we come across the configuration of the most important activity in this tutorial–i.e. REST Dispatch and Reply activity.
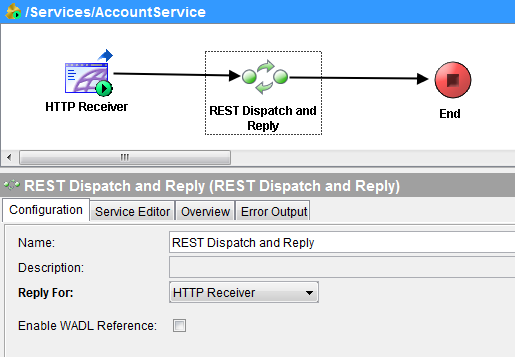
In the configuration tab of REST Dispatch and Reply activity, choose HTTP Receiver in Reply Fro drop down as shown below:
In the Service Editor tab, click on the application. I have renamed it to AccountApplication.
Right Click on the Application and choose Add–>RestService
A new REST Service will be added under the application. In this example case, I have renamed it to AccountService.
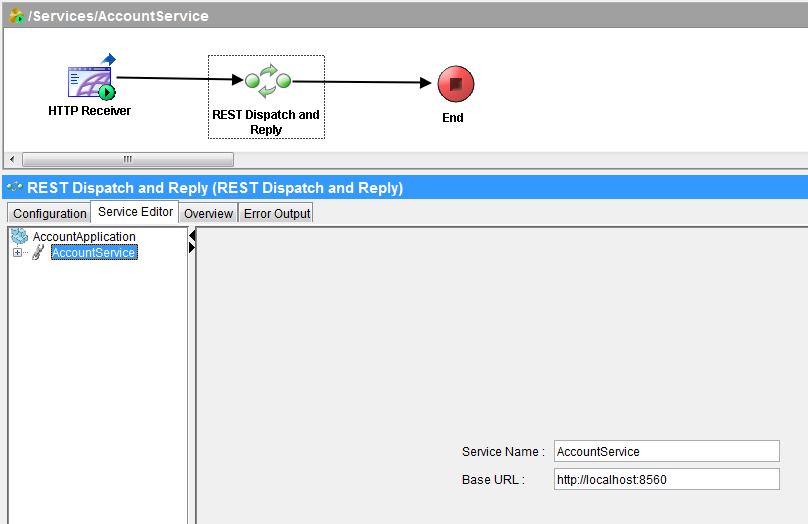
For this AccountService, specify the base URL. This URL should be same which you configured in your HTTP Connection:
Now Right Click on your service in the Service Editor tab and choose Add–>Resource
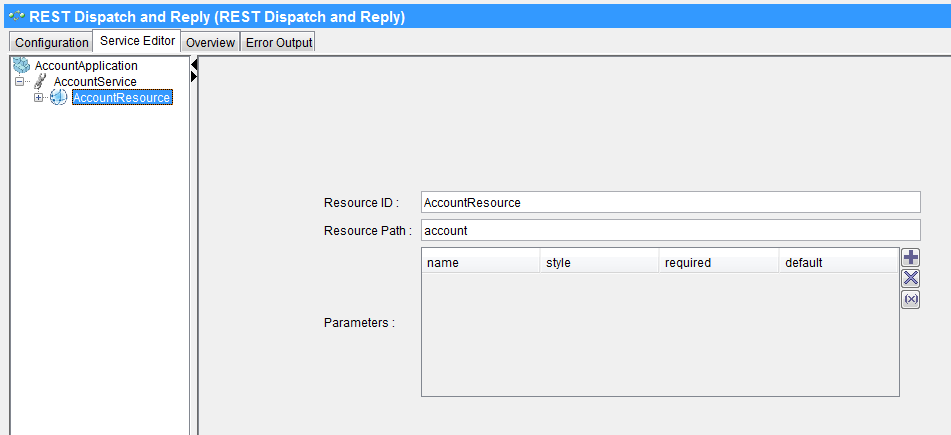
New Resource will be added under the service. I have renamed this resource to AccountResource. We don’t need to add any parameters as we will add parameters at method level instead.
The Resource will look like below:
Now right click on the resource and choose Add–>Method
A new method is added. I renamed it to GetAccountInfo. This will be the ID of this method. In the Method Name drop down, choose GET as we are implementing GET operation here.
In the Process Name, using binocular choose the process that we implemented in Step 3 (having business logic to fetch the data from the database).
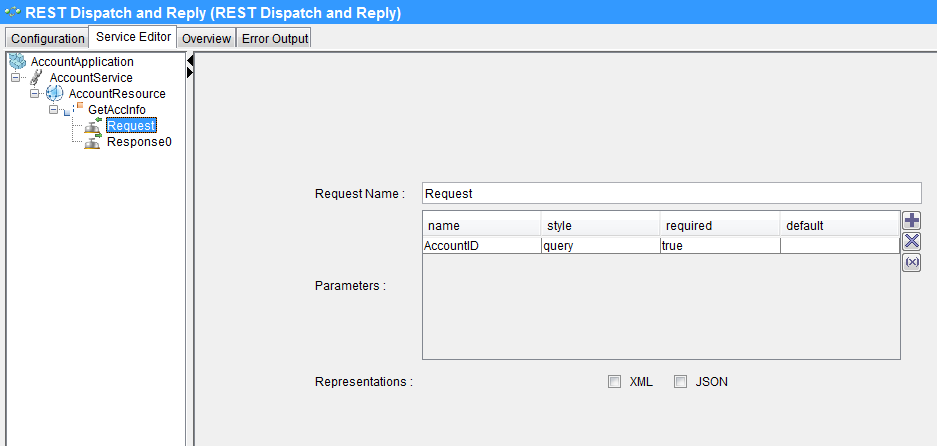
By Right Clicking on the Method, add Request and Response for the method. In the Parameter option of Request, using Plus button add a new parameter by choosing query in the style.
Now our service configuration in the Service Editor tab will look like below:
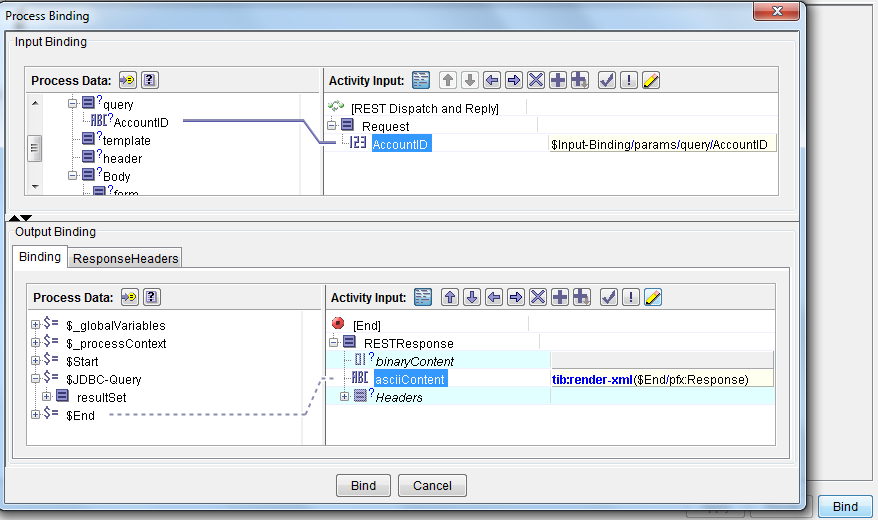
Now click on the method name so that Bind button in the bottom appears. Using Bind button, we will map the Input and Output for our service for this method.
As you can see in below diagram that we have used Bind button and then mapped AccountID as Input. Using Render-XML function, the response is mapped as output string:
This completes our configuration work for REST Dispatch and Reply activity.
Now we proceed to the next step in which we will create a client process which will use Invoke REST API activity to call our service.
Step 5: Use Invoke REST API activity to consume RESTFul TIBCO Web Service
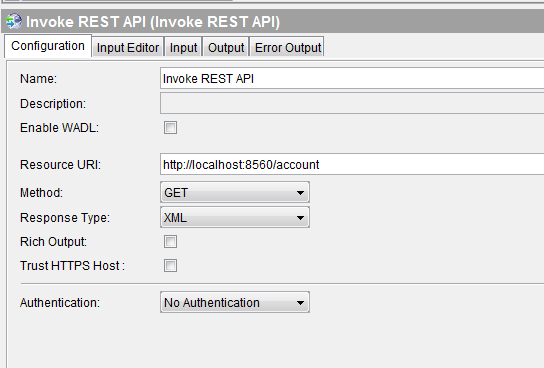
To consume RESTFul Service, I have crated a new process and dragged Invoke REST API activity from REST & JSON Palette in it. In the configuration tab of Invoke REST API activity, specify the Resource URI. This URI should point to the resource that was added to our service in previous step (bas plus Resource URL).
In the method choose GET and in the Response Type, choose XML. Complete configuration will be as shown in below screenshot:
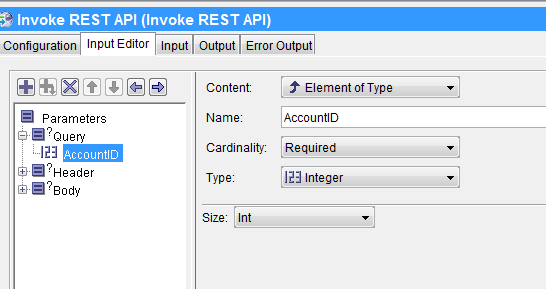
In the Input Editor tab, under the Query, add a new parameter AccountID which will be used to send the account id as parameter:
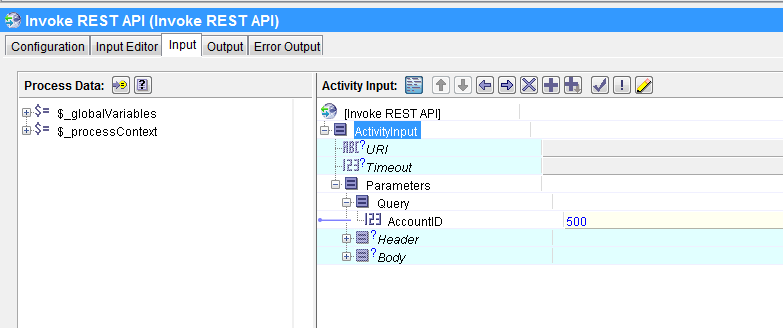
In the Input tab, I am assigning a hard coded value for now just for the example purpose:
As service will send back the response in string format (rendered xml text), I have used Parse XML activity to parse the response. Parse XML activity uses Response Element of the XML Schema that was created in Step 2 of this tutorial.
Now, we are done with the development part of our TIBCO Restful Web service. Next step is to test the web service and see the results.
Step 6: Test TIBCO RESTFul Web Service Using TIBCO Designer
Validate the project to make sure that there are no errors. Once validated successfully, load service as well as client process in the designer tester. Now create a new job in the designer tester for the client process (AccountInformationRequest process).
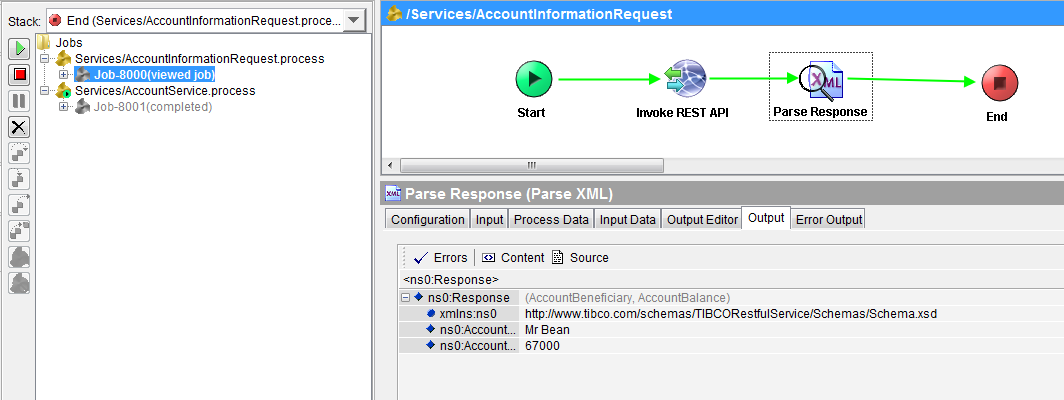
As you can see below, client process as well as service has run successfully and we have got a response which is parsed correctly:


Pingback: TIBCO EAI (Enterprise Application Integration) Architectural Decision Making | TutorialsPedia
I want to make restful webservice in tibco using HTTP palette, i dont want to use rest dispatch and reply palette. Please help me
Hi ajmal,
I am getting the following error pls help me
BW-XML-100005 Job-47000 Error in [Processes/InvokeREST.process/Parse XML]
An error occurred while parsing: White spaces are required between publicId and systemId..
caused by: org.xml.sax.SAXParseException; lineNumber: 1; columnNumber: 50; White spaces are required between publicId and systemId.
I have this error when executing… i made a http from a database in a server…
An error occurred while parsing: White spaces are required between publicId and systemId..
caused by: org.xml.sax.SAXParseException; lineNumber: 1; columnNumber: 50; White spaces are required between publicId and systemId.
I am getting below error.
Please make sure the Resource [/acount?AccountID=100] is available on server side!
Help to resolve this
Please provide TIBCO BW REST&JSON plugin
HI
Could you please brief on Restful services.
and under what scenario it is used ?
Regards
Gopi M
Pingback: 15 Most Popular TIBCO Tutorials on TutorialsPedia | TutorialsPedia
Thanks Ajmal for tutorial.
How can I provide http basic authentication on http receiver?
Dear Alex,
Basic authentication can be provided using “Identity” resource. Thanks
Ajmal, we use Identity when we have client project.
In this case, we have a server. I checked HTTP authentication, but where can we define username/password to validate the client.
Thanks a lot!
Ajmal, another question.
How can we expose wadl?
Hi Ajmal,
I am getting following error, can you help in resolving this. Thanks in advance.
BW-HTTP-100121 Activation error with process starter [DeptSrvcProcess.process]
caused by: An exception occurred while trying to initialize the Http server: %1
caused by: java.lang.VerifyError: class com.tibco.bw.service.binding.bwhttp.tomcat.TomcatRepoRealm overrides final method start.()V
Change “Http Connection” –>” Server Type” to “HttpComponent” instead of “tomcat” if you are testing on the designer.
hi Ajmal,
It seems you are god gifted in explaining anything very easily. I really liked the way you are teaching and helping to entire TIBCO community.
Thanks a lot.
Feel free to contact me at : +91- 9225602566
Hi Ajmal,
Sorry to bother you with this question.
Have you ever used Swagger to call your REST API’s?
I’m able to create the REST service withing TIBCO and calling it with the Swagger UI docs created, however, I’m not able to use the Swagger Tools to import Swagger JSON files to create the REST API in TIBCO.
Thanks a lot,
Elias
Sorry Elias. Haven’t used swagger.
I m getting the below error while invoking REST services
Activity invocation failed
com.tibco.pe.plugin.ActivityException
ActivityException
topicmessages/EmployeeWsdl/Invokerestapi.process/Invoke REST API
Pls help me on this
Hi Ajmal Abbasi,
I am looking for error handling in the above example. Can you please help me out if you have any example for error handling in different scenarios.
Hi,
I am trying to invoke a rest service with SSL authentication ,how can I configure this in invoke rest api plugin?
Hi,
I want to send a response in my restService with both responsedata (ascii content) and a pdf attachment. I am using restdispath and reply. I am giving the attachment details in headers correctly, but I Am not able to make it work. Can you let me know how to do it.
Hi Vincent,
I am also looking a solution for this. Can you let me know if you are able to make it work?
Thanks,
Sri
Hello Ajmal and thank for your excellent piece here. Can you show how to use JSON for the request and reply from the server? Since BW is XML-centric, I am not able to see how to convert and map between the HttpReceiver and the REST Dispatch and Reply
I have created a test case using Restful service where I’m passing Name as request data and trying to retrieve Account details in response. The “REST Dispatch and Reply” is not calling operation and returning response with error code “404”. Can someone please advice to fix this issue?
good day! can you please create a tutorial for restful web service using BW 6 please? thank you very much
Hello Ajmal,
It would be great if you could give the link to download the plug-in, I did not find the plug-in in evaluation or samples for downloading.
Thanks a lot, your tutorials have always helped me to get a better understanding of the concepts.!
i get an error in Parse Response (error xmlbinnary)
can you fix it ?
Dear Andi,
Please make sure that you choose Text for Input Style configuration of Parse XML activity.
Hi I had once scenario that is I need to replace SOAP call with REST API call in Tibco designer in bw 5 how would I and any process please share