MuleSoft RabbitMQ Integration is achieved using AMQP Connector. AMQP (Advanced Message Queuing Protocol) is a messaging protocol for RabbitMQ together with various other supported protocols. In this article, I will explain how to Publish and Consume AMQP messages with RabbitMQ queues and exchanges using MuleSoft AMQP operations.
MuleSoft RabbitMQ Integration Tutorial: How to Use AMPQ Connector in AnyPoint Studio
In order to use RabbitMQ as a message broker for a messaging based integration, MuleSoft provides connectors in AnyPoint Exchange. Specific connector to be used for enabling AMQP based messaging in MuleSoft is known as AMQP Connector. AMQP Connector provided by MuleSoft AnyPoint Exchange provides a rich set of operations which help in sending messages to RabbitMQ queues as well as receiving messages from RabbitMQ queues.
In order to publish messages to RabbitMQ queues, messages need to be published to an exchange as it is not possible to directly publish messages to the queues. RabbitMQ has various types of exchanges available which have been discussed in detail in RabbitMQ Introduction article. In case of a direct exchange, a one-to-one binding is created between Exchange and queue and messages are routed from Exchange to the queue based on routing key.
To use AMQP Connector in MuleSoft AnyPoint Studio project, following steps need to be performed.
Adding AMQP Connector in AnyPoint Studio from Exchange for MuleSoft RabbitMQ Integration
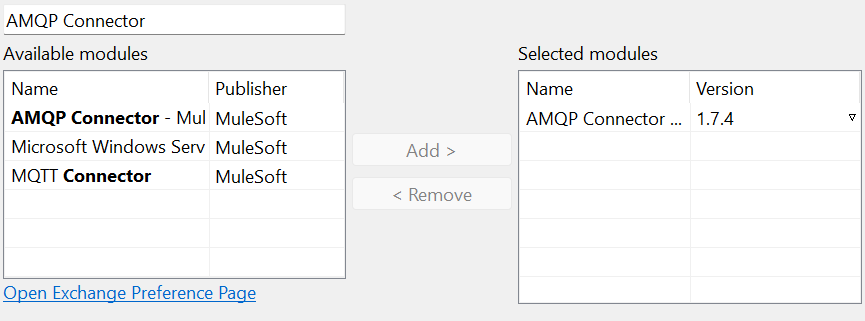
AMQP Module is not available by default in your AnyPoint Studio project. AAMQP Module can be made available by adding AMQP Connector from AnyPoint Exchange. For this purpose, you need to click on Search in Exchange and then login to your AnyPoint Account. Once you are logged in, you can search for AMQP and add AMQP Connector to your project.
Once AMQP Module is added, you will be able to use all of the available operations from this Module.
Configuring AMQP Connection in MuleSoft AnyPoint Studio
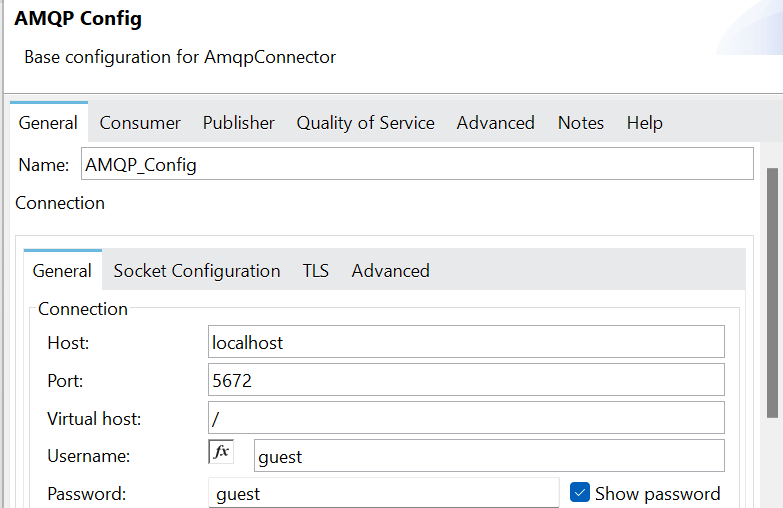
In order to be able to connect to RabbitMQ and use AMQP operations in your Mule Project, you need to configure a connection. For this purpose, in Global Elements, you need to add AMQP Config by selecting Connector Configuration–>AMQP Config.
Depending on your RabbitMQ installation, you need to provide the information. E.g. if you have installed RabbitMQ locally on your windows machine, your connection configurations will be similar to below:
 <<>> AMQP Config RabbitMQ Connection.png
By using Test Connection, you can verify that your configurations are correct.
AMQP Listener Configurations for Receiving Messages from RabbitMQ Queues
AMQP Listener is a message source available under AMQP Module which can be used to listen on a specific queue for any incoming messages. It can be used in a message flow which gets triggered whenever a new message becomes available in the queue.
In the Listener configurations, you need to specify queue name from which you want to receive incoming messages. There are plenty of other settings and parameters that you may try as per your requirements.
AMQP Publish Operation for Sending Messages to RabbitMQ
Publish operation available in AMQP Module can be used to send messages to a particular queue. Messages can not be published directly to the queue, rather it has to be sent through an Exchange. You can configure RabbitMQ Exchange using RabbitMQ Admin UI and then add a binding to a queue (in case of a direct exchange). Once binding has been configured, messages published to the Exchange from AnyPoint Studio will be sent to that queue.
MuleSoft RabbitMQ Integration Video Tutorial
In below video on TutorialsPedia YouTube channel, I have demonstrated how to integrate with RabbitMQ from MuleSoft AnyPoint Studio Project and then send/receive AMQP messages.
You can also refer to my other article Kafka vs RabbitMQ to learn how the two technologies differ at a high level.
Feel free to comment below if you have any questions or feedback.

