JAX-WS is a standard API used for creating java based web services particularly SOAP web services. JAX-WS API is available as part of your JDK installation. In this Java JAX-WS SOAP Web Service step by step Tutorial, we will develop a SOAP Web Service using JAX-WS Top Down approach. We will use MySQL database as our back-end database.
Who Should Read This JAX-WS SOAP Web Services Tutorial?
This tutorial is written in step by step details and even a beginner to the web service development can learn provided that he/she has basic knowledge of web services and java programming.
You should also have basic knowledge of database and should know how to use eclipse IDE for Java development.
By the End of This Java SOAP Web Service Tutorial, You will know:
• How to generate a web service with top-down approach using JAX-WS by creating Java Classes using wsimport tool and then incorporate them in your java project.
• How to implement web service endpoint interface using an implementation class.
• How to call DAO layer methods from your SOAP Web service implementation class.
• How to connect to MySQL database using JDBC and perform CRUD operation.
• How to deploy SOAP Web Service in Tomcat Server using Eclipse.
• How to test and consume a SOAP Web service.
Use Case Implemented for SOAP Web Service Step by Step Tutorial
For this step by step Java SOAP tutorial, we will implement a User Management Web Service with following key operations:
• Operation to add a new user to database table.
• Operation to update an existing user in database table.
• Operation to delete an existing user from database table.
• Operation to Fetch any user from database table.
• Operation to get all users from database table.
Tools & Technologies Used for the tutorial:
• JAX-WS API for building web service.
• MySQL database for storing data
• Eclipse as IDE
• Tomcat server to deploy the web service.
• SOAP UI as a client to test the deployed web service.
Now, we have discussed about the scenario to be implemented, tools & technologies to be used and we are good to go and proceed to our step by step tutorial to start implementing our SOAP Web Service.
Step 1: Create MySQL Database Table for JAX WS Soap Web Service Tutorial
For our Java SOAP Web service tutorial, MySQL database will be used so the first thing we need to do is to ensure that we have required database structure ready.
Using MysQL command line, We will create a database schema with the name Users using below command:
create database users;
Next we will use the command use users to choose the created schema and then run the below command to create our table:
CREATE TABLE TBL_USERS (user_id INT NOT NULL,user_name VARCHAR(255) NOT NULL,user_category VARCHAR(255),user_active_status BOOLEAN,user_level double,PRIMARY KEY ( user_id ));
We will save all users to this table from our web service later.
Step 2: Add Required Libraries in Tomcat Server
For our tutorial, we are not using Maven for dependency handling, so we need to download and add required JAX-WS jars in lib folder of tomcat manually. You can download jars from https://jar-download.com/artifacts/javax.xml.ws/jaxws-api/2.2.10/source-code and add these jars in your tomcat lib folder.
Although I am not using Maven for this tutorial, It is highly recommended to use Maven as maven will take care of all your dependencies and you won’t need to download any jars yourself and add manually.
Step 3: Create Dynamic Web Project for JAX-WS SOAP Web Service Tutorial
In Eclipse IDE create a new dynamic web project by choosing New –> Dynamic Web Project and name it as JAXWSSoapWebServiceTutorial and click Finish. A basic structure of your web project will be created.
We will add all our code and configurations to this project in our subsequent steps. You also need to specify Target Runtime and point to your tomcat server (which you should have installed in your machine).
Now we can proceed to our next step where we will create XML Schema and a WSDL file.
Step 3: Top-Down SOAP Web Service: Create XML Schema and WSDL File
For a Top-Down (Contract-First) Web service, we need to first define the contract and then create Java Classes based on that. For this purpose, we will create XSD file (XML Schema) for our User Management use case and then use elements from that XSD in the WSDL file for input and output messages for different operations.
You can create XSD by choosing File–> New–>XML Schema File and name it as UserSchema.xsd
Eclipse provide a good tool for creating XSD and defining elements and types. Using Eclipse, I created the schema with Users element containing User where User will have following primitive elements:
• UserID (Integer)
• UserName (String)
• UserCategory (String)
• UserLevel (Double)
• UserActiveStatus (Boolean)
Complete XSD file is as below:
<!--?xml version="1.0" encoding="UTF-8"?--> |
Now we will create a WSDL file where we will refer to the XSD elements from the above XSD file for message parameters of our operations.
For creating the WSDL file, choose File –> New –>WSDL File and name it as UserWS.wsdl
Eclipse provides easy graphical tool to construct your WSDL and you can add operations and specify input and output using this tool without manually writing anything in the source tab of your WSDL file.
Our WSDL file structure will look like below in Eclipse:
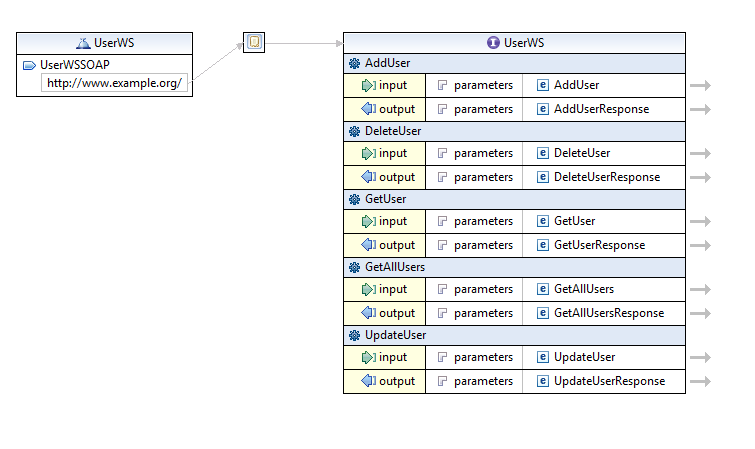
Below is the complete WSDL file with all messages, portypes, bindings etc. configured:
<!--?xml version="1.0" encoding="UTF-8" standalone="no"?--> |
Now we are good to go for creating java classes/interfaces from our WSDL file in next step.
Step 4: Create Java Artifacts (Classes & Interface) From WSDL Using WSImport Tool
For our top down SOAP web service, we will use JAX-WS wsimport tool for generating java classes and interface from WSDL file which we generated in our previous step.
Wsimport tool is available as part of JDK and is available in the bin folder of your JDK installation.
With the below command, we will create java artifacts from our wsdl file. All created source files (.java files) will be placed in the folder provided with –d option and we are specifying package name for our created java files using –p option.
wsimport -p com.tutorialspedia.jaxwsservice -s C:\temp\ UserWS.wsdl

With the above wsimport command, we will get following set of classes/interfaces created:
• AddUser.java (Java class for input message of AddUser web service operation)
• AddUserResponse.java (Java class for output message of AddUser operation)
• DeleteUser.java (Java Class for input message of DeleteUser operation of web service)
• DeleteUserResponse.java (Java class for output message of DeleteUser operation)
• GetAllUsers.java (Java class for input message of operation GetAllUsers)
• GetAllUsersResponse.java (Java class for output message of GetAllUsers operation)
• GetUser.java (Java class for GetUser Operation input message)
• GetUserResponse.java (Java class for GetUser operation response message)
• UpdateUser.java (Java class for input message of UpdateUser operation)
• UpdateUserResponse.java (Java class for output message of UpdateUser operation)
• ObjectFactory.java (Factory class for creating objects)
• Package-info.java (File containing package details)
• UsersType.java (Java class with getter/setter methods for our complex type Users)
• UserType.java (Java class with getters/setters for User object)
• UserWS_Service.java (Class for the client of web service)
• UserWS.java (Service Endpoint Interface containing signatures of all methods of web service) which need to be implemented in our implementation class.
Once all above classes have been created with wsimport command, you need to copy the created folder in your eclipse project under src folder so that all these java artifacts become part of your dynamic web project.
Step 5: Develop SOAP Web Service Operations by Implementing Service Interface
In this step we implement all service operations by creating an implementation class UserWSImpl.java in which we implement methods of our SEI (Service Endpoint Interface)
The implementation class has following annotations:
• @WebService annotation to mark it as a web service implementation class.
• @WebMethod annotation for our methods which are implementing web service operatons.
• @WebResult annotation to customize our Response element (e.g. to give response element a meaningful name)
• @WebParam annotation to get web service parameters received from the client.
In our Service implementation class, we are calling our DAO class method so that all the logic for database handling is segregated from our service layer.
Complete code of our Service Implementation class is as below:
package com.tutorialspedia.jaxwsservice; import javax.jws.WebMethod; import javax.jws.WebParam; import javax.jws.WebResult; import javax.jws.WebService; import com.tutorialspedia.dao.UserDAO; @WebService public class UserWSImpl implements UserWS { UserDAO userdao; @Override @WebMethod @WebResult(name="ResponseMessage") public String addUser(@WebParam(name="User") UserType addRequest) { return new UserDAO().addUser(addRequest); } @Override @WebMethod @WebResult(name="ResponseMessage") public String deleteUser(@WebParam(name="UserID") int userID) { return new UserDAO().deleteUser(userID); } @Override @WebMethod @WebResult(name="ResponseMessage") public String updateUser(UserType updateUserRequest) { return new UserDAO().updateUser(updateUserRequest); } @Override @WebMethod @WebResult(name="User") public UserType getUser(@WebParam(name="UserName") String userName) { return new UserDAO().getUser(userName); } @Override @WebMethod @WebResult(name="Users") public UsersType getAllUsers() { return new UserDAO().getAllUsers(); } } |
Step 6: Implement DAO Layer with JDBC to for SOAP Web Service to Save Data in MySQL Database
For our tutorial, we will use JDBC with MySQL driver to connect with MySQL database to perform all CRUD operations in our dtabase table TBL_USERS which was created in Step 1 of this tutorial.
Our DAO class (UserDAO.java) implements all CRUD operations for our web service to save, fetch, update and delete records from users table.
Below is complete code for our DAO implementation class:
package com.tutorialspedia.dao; import java.sql.*; import com.tutorialspedia.jaxwsservice.UserType; import com.tutorialspedia.jaxwsservice.UsersType; public class UserDAO { static final String DB_DRIVER = "com.mysql.jdbc.Driver"; static final String DB_URL = "jdbc:mysql://localhost:3306/users"; static final String DB_USERNAME = "root"; static final String DB_PASSWORD = "root"; Connection connection; Statement statement; public UserDAO() { initialize(); } /* This initialize method will initialize database connection to MySQL database */ public void initialize() { try { System.out.println("Initializing DB Connection"); Class.forName(DB_DRIVER); connection=DriverManager.getConnection(DB_URL,DB_USERNAME, DB_PASSWORD); System.out.println("Connected"); } catch (Exception e) {e.printStackTrace();} } /* This method adds a user object in the database */ public String addUser(UserType u) { String ResponseMessage=""; try { statement=connection.createStatement(); String addSQL="INSERT INTO TBL_USERS VALUES (" +u.getUserID() +",'"+ u.getUserName() +"','"+ u.getUserCategory()+"',"+ u.isUserActiveStatus()+","+ u.getUserLevel()+")"; System.out.println(addSQL); int count= statement.executeUpdate(addSQL); ResponseMessage= (count==1)? "User Added Successfully": "Error Inserting Database"; return ResponseMessage; } catch (Exception e) { e.printStackTrace(); ResponseMessage="Error Inserting Database"; return ResponseMessage; } finally { if (connection !=null) try { connection.close(); } catch (Exception e) {} } } /* This method returns a user object based on the userName. In real scenarios, we can have multiple users with same name and for such cases, userId should be used instead but here for the sake of simplicity, we will use userName as argument. */ public UserType getUser(String userName) {UserType u=null; try { String getuser_sql="SELECT USER_ID, USER_NAME, USER_CATEGORY, USER_LEVEL, USER_ACTIVE_STATUS FROM TBL_USERS WHERE USER_NAME='"+userName+"'"; System.out.println(getuser_sql); statement=connection.createStatement(); ResultSet resultset= statement.executeQuery(getuser_sql); while (resultset.next()) { u=new UserType(); u.setUserID(resultset.getInt(1)); u.setUserName(resultset.getString(2)); u.setUserCategory(resultset.getString(3)); u.setUserLevel(resultset.getDouble(4)); u.setUserActiveStatus(resultset.getBoolean(5)); break; //As we want to get only one record } return u; } catch (Exception e) { e.printStackTrace(); return u; } finally { if (connection !=null) try { connection.close(); } catch (Exception e) {} } } /* This method is used to update any existing user */ public String updateUser(UserType u) { String ResponseMessage=""; try { statement=connection.createStatement(); String update_sql="UPDATE TBL_USERS SET USER_NAME='"+u.getUserName()+"', USER_CATEGORY='"+u.getUserCategory()+"', USER_LEVEL="+u.getUserLevel()+", USER_ACTIVE_STATUS="+u.isUserActiveStatus()+" WHERE USER_ID="+u.getUserID(); System.out.println(update_sql); int count= statement.executeUpdate(update_sql); ResponseMessage= (count==1)? "User Updated Successfully": "Error Updating User"; System.out.println("Returning response message: "+ResponseMessage); return ResponseMessage; } catch (Exception e) { e.printStackTrace(); ResponseMessage="Error Updating User"; return ResponseMessage; } finally { if (connection !=null) try { connection.close(); } catch (Exception e) {} } } /* This method will delete a user from database based on the provided user id */ public String deleteUser(int uid) { String ResponseMessage=""; try { statement=connection.createStatement(); String delete_sql="DELETE FROM TBL_USERS WHERE USER_ID="+uid; System.out.println(delete_sql); int count=statement.executeUpdate(delete_sql); ResponseMessage= (count==1)? "User deleted Successfully": "Error deleting User"; System.out.println("Returning response message: "+ResponseMessage); return ResponseMessage; } catch (Exception e) { e.printStackTrace(); ResponseMessage="Error deleting User"; return ResponseMessage; } finally { if (connection !=null) try { connection.close(); } catch (Exception e) {} } } /* This method returns all users available in the database table */ public UsersType getAllUsers() { UsersType users=new UsersType(); try { String getalluser_sql="SELECT USER_ID, USER_NAME, USER_CATEGORY, USER_LEVEL, USER_ACTIVE_STATUS FROM TBL_USERS"; System.out.println(getalluser_sql); statement=connection.createStatement(); ResultSet resultset= statement.executeQuery(getalluser_sql); while (resultset.next()) { UserType u=new UserType(); u.setUserID(resultset.getInt(1)); u.setUserName(resultset.getString(2)); u.setUserCategory(resultset.getString(3)); u.setUserLevel(resultset.getDouble(4)); u.setUserActiveStatus(resultset.getBoolean(5)); users.getUser().add(u); } return users; } catch (Exception e) { e.printStackTrace(); return users; } finally { if (connection !=null) try { connection.close(); } catch (Exception e) {} } } } |
Now our implementation part Is completed and we are ready to move to our next step where we will do the necessary configurations for deployment.
Step 7: Modify Web.xml File and Create sun-jaxws.xml File For Deploying SOAP Web Service to Tomcat Server
In order to deploy our web service in Tomcat Server, we will update our Web.xml file to specify servlet and mapping details like below:
<!--?xml version="1.0" encoding="UTF-8"?-->


            com.sun.xml.ws.transport.http.servlet.WSServletContextListener


        TutorialsPediaSOAPWS

            com.sun.xml.ws.transport.http.servlet.WSServlet

        1


        TutorialsPediaSOAPWS
/tutorialspediaws |
For our JAX-WS based SOAP Web service, we need another XML file sun-jaxws.xml file in WEB-INF folder. In this XML file we will configure our service Endpoint along with implementation class name so that web service implementation class can be invoked once deployed.
Below are the contents of our sun-jaxws.xml file:
<!--?xml version="1.0" encoding="UTF-8" ?--> |
Step 8: Deploy JAXWS Web Service in Tomcat and Test from the Client
We can either create a WAR file and deploy it in Tomcat Server or we can use Eclipse feature to run our service on Tomcat Server directly with just a few clicks. First validate your project to make sure it gets validated and there are no issues in your code.
From eclipse you can simply choose the option Run–> Run As –>Run on Server and then choose Tomcat Server and your service will start running in Tomcat Server.
Once your service has started, you can go to your web browser and access the WSDL of your deployed service using the URL as below (Make sure that you specify host and port as per your tomcat setup):
http://localhost:8085/JAXWSSoapWebServiceTutorial/tutorialspediaws?wsdl
You should be able to see your concrete WSDL using above URL.
Now we can use any client tool to test our web service. Instead of creating client class in java and test the service, I will use SOAP UI where we will create a SOAP project using above WSDL and invoke operations of the web service.
Please note that I have pre-populated table with some records and will perform CRUD operations additionally.
As you can see below, we are able to consume web service and all operations are working fine:
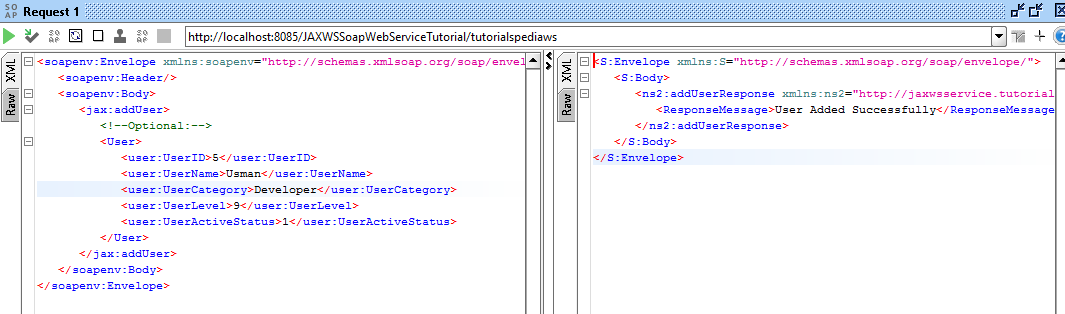
Below screenshot shows I am able to add a new User to the database using our SOAP Web Service operation:
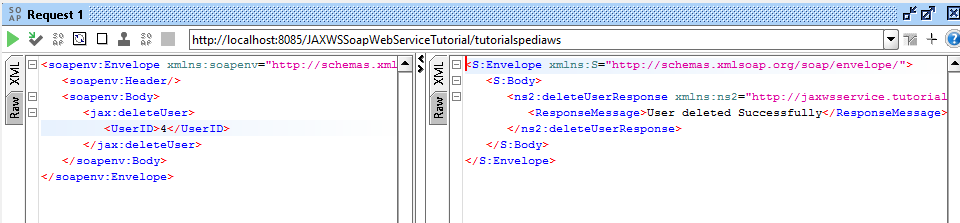
Below screenshot shows I can delete an existing user:
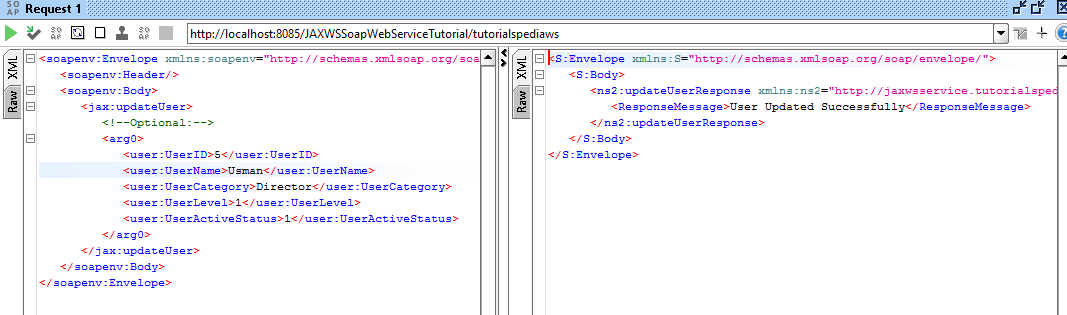
As you can see in the screenshot below, I have successfully updated an existing record:
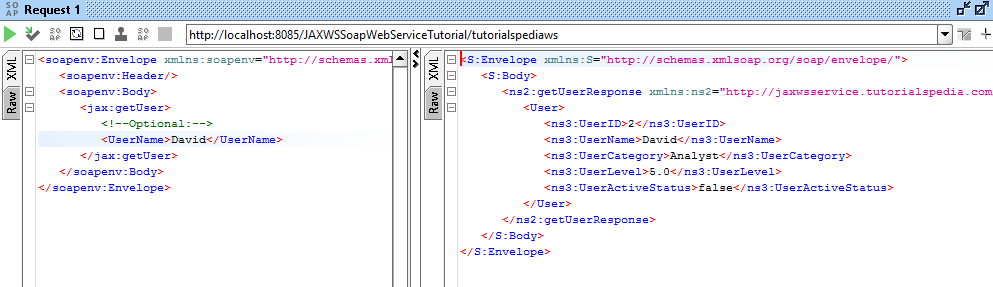
I can fetch one record by specifying username to fetch:
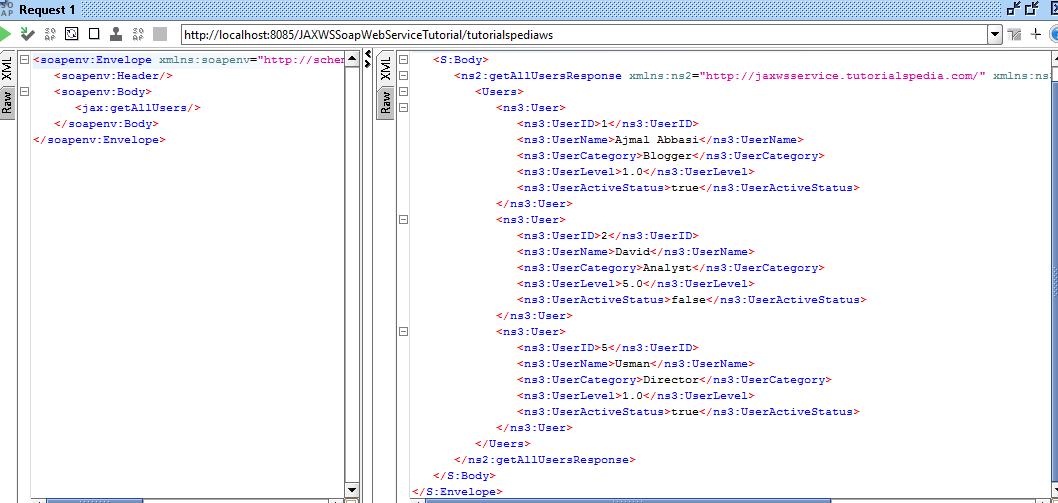
And at last, I have fetched complete list of users using getAllUsers operation:
This completes our JAX-WS SOAP web service step by step tutorial. Feel free to comment below if you need any further help or clarification.
Nice article. . you can sent to me code source is better. .
Few Suggestions
1) Always Versions of the softwares( tools ) that are used on which the above top down approach is developed tested and working without any issues
For example JDK Version, Tomcat Version , Eclipse IDE Version etc
2) Always mention all the dependencies that are used while developing and testing above example
3) It’s would have been quite good if all the jars which are used as dependencies are provided along with this article
4) As mentioned in this example that you are following top down-approach (also know as Contract first)
in this approach I think wsimport can be used but in the exception that I got it says “jaxws” (skeptical)
Tomcat Server is not starting (No Clean Start) throwing following exception
com.sun.xml.ws.transport.http.servlet.WSServletException: WSSERVLET11: failed to parse runtime descriptor: runtime modeler error: Wrapper class com.tutorialspedia.jaxwsservice.”jaxws”.GetUser is not found. Have you run APT to generate them?
Pl. Provide above details if you can
Thanks
Also I altered the following wsinport command
From : wsimport -p com.tutorialspedia.jaxwsservice -s C:\temp\ UserWS.wsdl
To : wsimport -d build/classes -s src -p com.tutorialspedia.jaxwsservice ./wsdl/UserWS.wsdl
Create a folder name as wsdl at src level in Dynamic we b project of eclipse
After doing this there is not need to do Following step mentioned in this example
Once all above classes have been created with wsimport command, you need to copy the created folder in your eclipse project under src folder so that all these java artifacts become part of your dynamic web project.
Also It would be better and quite help full if more details are provided about creating each and every element of the above WSDL because in top down aproch WSDL and XSD need to be created first if that goes wrong then everything after words goes wrong
Thanks
Can I get XSD or WSDL file. Just want to see how you are creating request and response in WSDL file.
do u have that wsdl file
would you please show us how to do sign in and sign up
Hello,
Nice article. I’d like to know where did you add the jdbc driver for database. I have a similar implementation but the system can´t find the jdbc driver and the connection is not possible.
Kind regards,
AR